The thought behind this layout: The acrylic lock signifies the cherished memories locked in time, remnants of which are held within this 5" keepsake box
Its done is tones of pink and brown with lots of embellishments mounted on a rose paper base.
The letters were done using stamps followed by distressing the edges and all.
The envelope was plain and I added the cherish sentiment to it. I got the print as a free printable, which I folded to form an envelope.
On the top I added a metal filigree; I've had this since forever and I love it.
Organza ribbon added round the edges. You can also see that the entire box has been distressed and aged to go with the theme.
Yes this is a much delayed post, sorry.
So the 2nd and last challenge for March, as decided by Khadija is "Vintage". (It's the last challenge for March because between all the
orders, freelance projects and organizing an exhibition scheduled for
the 31st of March (inshallah), I am not getting any time to myself )
Challenge 2 : Design anything with a Vintage theme.
Here is what Khadija designed; I'll post my project tomorrow inshallah!
As per Khadija, this is a 15 min project -excluding the time spent on making the flower-.
*Sigh* its been a very long, very busy and a very tiring week so far, alhumdolillah. I had completed this project on Sunday or Monday, but just didn't get a chance to post. So without further delay, I give you Project 8 - I Adore You!
The beauty of this card lies in the white roses. Each rose is hand made using the Tim Holtz die; the largest with 7 layers, medium with 6 and small with 3. The flourish in the background is white chipboard, and the cardstock is from Memory Box. I don't remember the exact name of the pa because two of Memory Box stacks got mixed somehow, and now I cant remember which is which. The little 'dew drops', I don't know what to call these. They aren't exactly rhinestones, but something on those lines. The dew drops were inspired by Erum Tasneem's cards - her recent
collection has bursts of glitter balls, and bling and they look really
nice. Added some trim to give the card 'the complete look.'
I wanted the roses to be pure white. I simply shaped the petals without using any ink or paint on them.
This project was inspired by the Craft Hop weekly challenge posted by Firefly. The requirements were super simple; Spring - incorporate a hand made flower.
I had received some new supplies from Many Happy Return, and I couldn't wait to try them out - this theme let me incorporate all my favorite supplies. so YAY!
This is a big card ladies! 6.25" x 6.25". All embellishments except the flowers are chipboard. Papers used are from My Mind's Eye and DCWV. All flowers are hand crafted!
The sentiment "Moments in time", because spring always gives us some awesome moments :)
Happy Crafting!
I did a glittery girly cylindrical basket for the Craft March Challenge 1, and filled it to the brim with yummy cookie and creme chocolate kisses :D. (And I just decided to name this "Sweet Smiles" )
Here is what the finished project looks like:
This was super easy, done using 2 contrasting cardstock pieces, 1 stamp, some crochet lace, doily with hints of glitter, and cardboard for the base.
The hand made flowers have glitter centers, and each flower is no more .75".
"I used some punched flowers and that big
flower is made out of heart punch and a regular flower die cut (well I
cut mine free hand). I used 25 heart punch outs and curl their both
round parts on a crochet hook. I, then, distress them and paste them one
after another on the flower base. The center bud was a small 0.75cm
circle punch out, I just rolled it and adhered it with some hot glue.
The box was originally yellow,
I gessoed it first and then adhered red
cardstock and then yellow chevron paper from American Crafts. Added some
butterfly punch outs, and some pearls here and there.
The box is 3.5x8.5 inches in size. And it can hold a large tag book
inside easily. Well I made this box to keep all my keys, birdcages and
punchinella in it.
This whole challenge thing is really exciting. I had heaps of fun altering this box. :D "
Khadija.
My project for today is slightly different from the previous 4. This project is linked to the Craft March Challenge in a way; I've done a video tutorial on how you can make a 13 petal 3D flower with a button center. (This tutorial was long over due and I'm glad to have finally done it).
Used the same flower with a different center for this card too. I had done about 150 of these flowers for a baby announcement project in 2011 :D
Video Tutorial
Pictures and Instructions (for those who can't access the video)
1. Cut out 13, 1" hearts. Each heart will be used for the petals. (Heart is not a must, can be any shape that is broad on the top and narrow at the base)
2. Cut out a rough circle; this will work as the flower base.
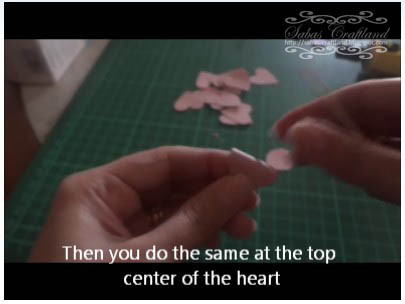
3. Shape the petals using a stick or any smooth surface object.
- to shape first wrap and roll one side of the heart half way
- then the other side
- then do the same at the top center
- then dent the petal in the center so that it sits up
- repeat for all 13 petals
4. Glue down the petals. 2 on opposite side, and then 2 on the remaining sides. Like a cross. This is your first layer with 4 petals.
5. repeat the same to form the second layer and then the third layer
this is what it looks like after the 3rd layer completes:
6. Position and glue the last two petals to balance the flower.


