Its spring! Let the flowers blooms <3
The theme for
Artful Crafting Challenge 11 is Flowers, and so my project has lots of flowers on it.
I begin with my super fabulous Kit (and speaking of Kit, AC has started its Kit Club and the
Spring Kit is up for grabs)
I was so excited to see the
Thermoweb Rainbow Deco Foil, and the
Thermoweb Deco Foil Adhesive in my Kit! These are so easy to work with and the results are simply amazing.
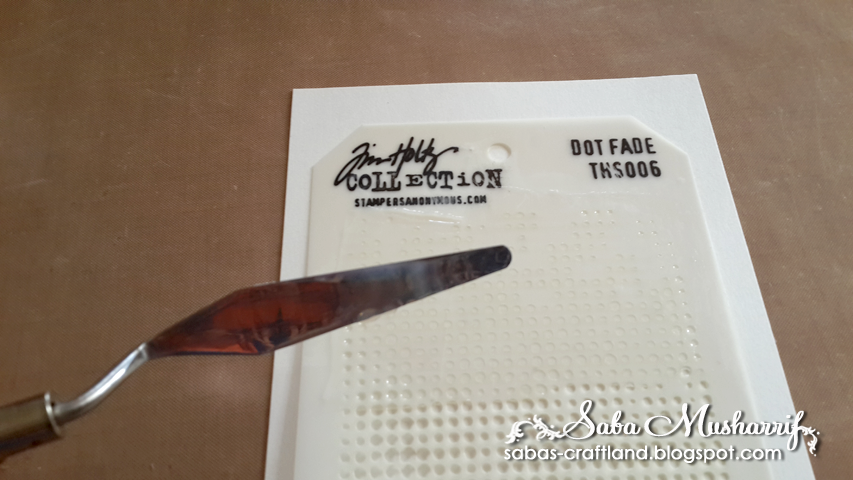
For the background I stenciled the
Thermoweb Deco Foil Adhesive onto an off white base. Now before you start using the adhesive, please unscrew the top and remove the seal.
I layered the
Tim Holtz Dot fade stencil onto the cardstock, and applied the adhesive over it with a painters knife.
I spread the adhesive evenly over all the required area. Once done I removed the stencil carefully, and soaked it in water immediately. To ensure that the stencil does not get spoilt, wash it immediately.
Once done, the adhesive needs to dry. As per the instructions, it dries in an hour, but in my case it dried in 10 minutes. I believe the weather, and thickness of the adhesive layer, impacts the drying time.
It is worthy to note here, that unlike other adhesives, the
Thermoweb Deco Foil Adhesive stays sticky after it dries, and it is the stickiness that adheres the foil to the design. Each tube of
Thermoweb Rainbow Deco Foil contains 5 sheets, and these are pretty thin sheets, so to be safe, when you take one out check ensure its just one and not two.
Next, I covered the adhesive base with foil, as seen above. When adhering the foil, please be sure that the bright shiny side is facing you. Then, gently rub over the foil to ensure it adheres well. I would not advice anyone to use a ruler, or a scoring at this stage, and avoid pressing down too hard on the foil, as it would make the adhesive spread and spoil the design.
Once satisfied, I gently peeled off the foil. Now, if you feel that some areas haven't foiled properly, just rub the foil over it again. As long as the adhesive is sticky, the foil with cover whatever area is left.
I was happy with how it turned out! its so simple and easy.
Now for the
Gerbera Daisy, I used the spellbinders die which too was part of my kit.
Using the die, I cut out
16 petals each,
4 large and 2 small petal bases, and
2 centers. These dies make the task of flower making super simple. Just take each petal and push it through each slit, the large and medium petals go in the large base, while the small ones go into the small base. You can add glue to the tab on the bases, and stick the petals down as you push the petals in.
This is what they should look like. By the way, I cut the petals out of
MME Look At This, and the petal bases and centers from
American Crafts Banana, textured cardstock.
Next, I shaped the petals lightly, which isn't necessary but I like shaping them. I simply flipped the layer over and shaped the petals with inward strokes. Did the same for the centers to curl them up. Next, I just stacked the layers one on top of the other and glued them down.
Last but not the least, I selected 2
purple Lillies, 1
pink Lilly, 2
pink rosebuds, and 3 leaves from the bunch of amazingly beautiful mulberry flowers, and arranged them over a decorative frame cut out of
MME This Moment, which I adhered to the foiled base. Next I added a sentiment to finish it off.
A couple of close ups below:
Supplies Used:
Thermoweb Rainbow Deco Foil
Thermoweb Deco Foil Adhesive
Spellbinders Gerbera Daisy
MME Look At This
MME This Moment
American Crafts Banana
Purple Lillies
Pink Lilly
Pink rosebuds
Hope you enjoyed reading this post, looking forward to your entries to
Challenge 11
Happy Crafting!