Showing posts with label 13 petal flower. Show all posts

Wednesday, March 6, 2013

Craft March: Project 5 - Flower Tutorial

My project for today is slightly different from the previous 4. This project is linked to the Craft March Challenge in a way; I've done a video tutorial on how you can make a 13 petal 3D flower with a button center. (This tutorial was long over due and I'm glad to have finally done it). 


Used the same flower with a different center for this card too. I had done about 150 of these flowers for a baby announcement project in 2011 :D


Video Tutorial


Pictures and Instructions (for those who can't access the video)

1. Cut out 13, 1" hearts. Each heart will be used for the petals. (Heart is not a must, can be any shape that is broad on the top and narrow at the base)


2. Cut out a rough circle; this will work as the flower base.


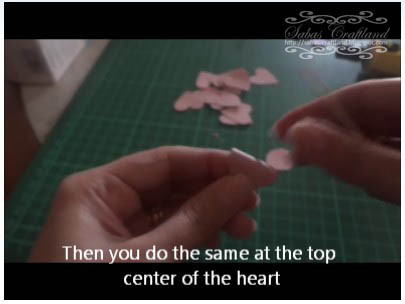
3. Shape the petals using a stick or any smooth surface object.

- to shape first wrap and roll one side of the heart half way


- then the other side

- then do the same at the top center


- then dent the petal in the center so that it sits up


- repeat for all 13 petals

4. Glue down the petals. 2 on opposite side, and then 2 on the remaining sides. Like a cross. This is your first layer with 4 petals.


5. repeat the same to form the second layer and then the third layer


this is what it looks like after the 3rd layer completes:


6. Position and glue the last two petals to balance the flower.


Now take a button and glue it to the center.


Your flower is ready


Happy Crafting!


Wednesday, October 12, 2011

Acrylic Resist! Finally :D

Peace be with you!


I am really excited about sharing my newest project this Wonderful Wednesday. I finally got around to implement what I learnt from Beate's tutorial. I cannot begin to tell you how eagerly I looked forward to trying out the acrylic resist technique. Every week I planned to do it, and every time something came up...I just wasn't able to get down it, and then it happend! yay!!

Here is the first look; the beauty in all its glory.
I just love the end result!


So basically all you need for this particular card is white cardstock; yup, that is correct, just plain white card stock (you can of course use whatever you like, the point is that you can make something like this with just the basics). I did not use any colored paper, or patterned paper time; just distress inks and acrylic paint.


This is a square card, the stamped with inkadinkado (that is such a cute name :D), and inked with Tim Holtz's distress inks. I used the same stamp for the base as well as the petals :). Here is a close up of the flower, it is the same 13 petal flower used for the earlier for the Simple 3D card, slightly altered this time to go with the theme.


I used vintage photo and wild honey for the flower, and worn lipstick for the base. Worn lipstick as you know is a bit on the darker side, and that is one of the reasons why I used it. I wanted to give the card a warm feel, but did not want it to be really dark; so worn lipstick was applied in circular strokes with medium pressure. When working on the flower, you would want to stamp and color the cardstock before cutting out the petals; its much easier that way. Oh, and incase you are wondering about what lies in the center ... well that is puff paint :) pretty puff paint. hehe


Here is a close up of the faux stitch... doesn't that look awesome! I explored with puff paint this time, and it turned out great...I think it looks so much better than the one done with gel pen; but chances of messing up when using puff paint are a lot higher too. 

And that is about it!
Happy happy crafting! (must try acrylic resist ;) )


For further queries email sabascraftland@gmail.com
for purchase write to us at favorsmore@gmail.com or visit Favors & More.

Wednesday, September 21, 2011

A Simple 3D Card

Peace be with you,
I'm blogging after a fairly long break; sincere apologies for that. Actually my love for working with different mediums led me to playing around with dough; (yes DOUGH) and guess what! my oven blew up :P

Coming back to today's post ...I wanted to create a card which was simple yet unique.

If you have had a chance to browse through the collection of cards posted on my facebook page, you would notice that the cards are not very heavily embellished. This time round too I have kept the theme very simple, added a 3D effect and used the white cardstock as the base for this card.


To avoid adding too much color, I stuck to shades of lilac on this. The darker shade has been added strategically to highlight and bring out the lighter color. If you look closely at the picture below you will notice that the outer petals are dark, while the center is lighter.
To add detail, the darker petals were outlined with faux silver stitching. The lighter petals are however done with embossed lilac cardstock; so the embossing seems like veins on the petals :)
This beautiful flower gives the card a 3D feel; (obviously, cause the flower is 3D :D ) made out of 13 petals. I will be doing a tutorial on how to make this flower in the coming week or two.

Next, some lilac rose buds and a bow were added to accentuate the flower and to give it a soft/warm feel. :)

I made the greeting look like it was written on a scroll...not exactly a scroll scroll... but just wanted to give it that look. This technique is very simple and easy to do. Just distress the edges of the cardstock, stamp the greeting in the desired color, and then carefully curl the edges using a quilling tool or your fingers. Once done just stick it where you want.

TIP: Plan the layout and embellishments before assembling such a card. We have worked directly on the cardstock base, so a slight error would ruin the entire card.

Happy Crafting :) 

Related Posts Plugin for WordPress, Blogger...