Wednesday, September 30, 2015

Tutorial: Acetate Flowers

Hello hello! I thought of doing a bonus tutorial this month, and decided on making acetate flowers using alcohol inks. The above picture shows the finished piece. These are super easy to make and take about 10 minutes, max!

Lets get started, supplies required:
Alcohol Ink Blending Solution (optional)
Alcohol Ink: Raspberry (or any other color of your choice)
Alcohol Ink Mixative: Silver (or any other)
StazOn Ink: Black

Stamp: Bo Bunny Floral Stamp
Acetate Sheet
Paint brush
Plastic Palette or something similar


Scissors
Glue

Step 1: Ink up your stamp with StazOn, and carefully stamp out 3 images of the same flower, with the same stamp. (Use StazOn because it works with non-porous surfaces, unlike other inks.)
The stamped acetate

Step 2: Once dry, flip the stamped acetate, and color the reverse image with Raspberry. Be sure to color the petals ONLY. If you want a lighter shade, mix a few droplets of ink with blending solution, and color using a brush, that is what I did. Otherwise, apply the ink directly, and use the brush to control it.

The ink mixed with blending solution
Coloring the petals with a brush

Step 3: When the petals have dried, add a drop of mixative to the center, and spread it, with outward strokes. Remember, that you are coloring the reverse side of the stamped image, so don't panic if the mixative covers the stamped details.
Add a drop of mixative
Spread the mixative

Step 4: Using scissors, cut out the flowers by following the outline. Then, separate each petal by following its outline, without detaching it from the center. The cut out flowers should look something like the the picture below.
Place the flowers, stamped side up, so that all the details of the stamped image are visible. (This is one of the reasons why we color/ink the reverse side)
Cutout flowers with the stamped side up

*From this point forward we work on the flowers with the stamped side up.* 
 
Step 5: Now take one flower, and shape it, by gently bending the entire petal inwards (towards the center). When you bend it in, don't press the crease; you want the petal to stand up when you leave it. Once you've done that with all the petals of this flower, gently turn the tips of the petals outwards, without creasing them.
Bending the petal inwards
Bending the petal tips back

Step 6: Take the second flower, and shape it, by gently bending the tips of the petals outwards, and slightly bending the petal inwards. Unlike the first flower, you will only bend the petals in, half way, so that they aren't flat.
Bending the tips of the petal outwards
Step 7: The shaped layers should look something like this:
L-R: Layer one or top layer, Layer 2 or middle layer, Layer 3 or the base layer.
We will simply stack the layers now by sticking Layer 2 onto layer 3, and layer 1 onto layer 2. The flower has now taken shape.
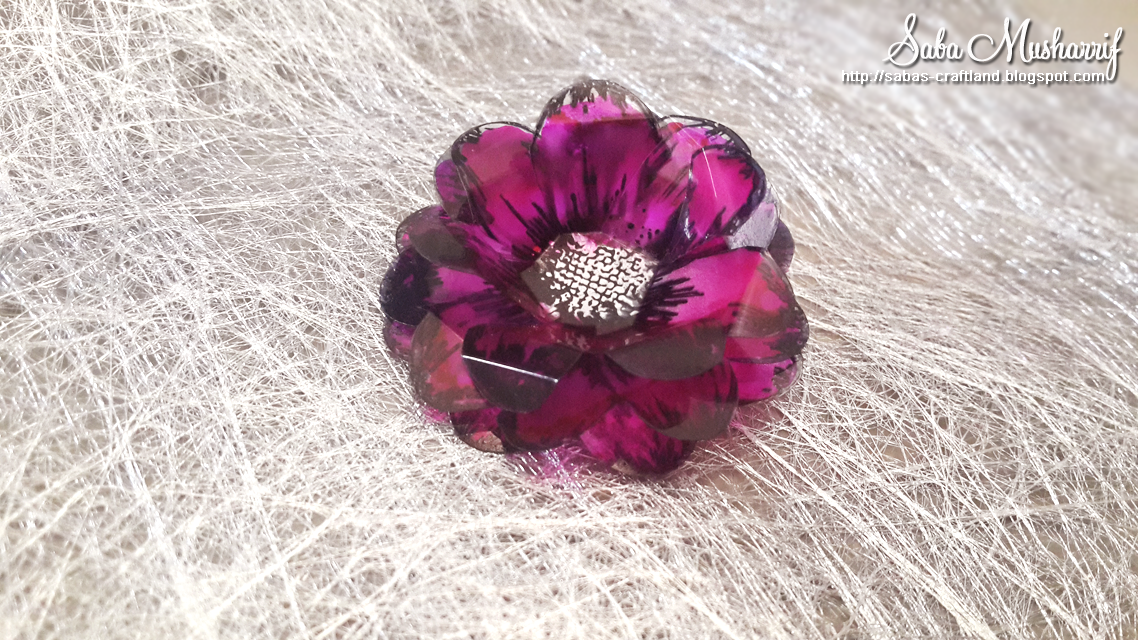
The assembled flower
I took it a step further and turned it into a brooch, by sticking the gorgeous flower onto a brooch pin.
mounted on a brooch pin
You can now, use this lovely flower however you want.
The gorgeous brooch
Do give it a try, I would love to see your take on it.
Happy Crafting!
 

Thursday, September 24, 2015

Scrapbook (Memory Book): Princess

Fairy tale Princess was one of my recently completed projects; an 8" x 8" scrapbook / memory book made for a baby girl. The requirement was to keep the pages open, as in, not restrict them with specific events, thereby allowing the parents to document moments as they deem fit.

So there are a lot of photomats in there, and lots of room to document.

This a photo wallet, with a cute belly belt.

I love the little details that are part of the Simple Stories: Enchanted collection.

Its not easy being a Princess!

This is such a lovely page, and its a shame that I was unable to capture its beauty, even though I tried several times! The heart is actually silver foil, and the pocket holds a removable tag.

Love the Toad! Micro beads used as centers for the flowers

One of my favorite pages from this book. I love threading the scalloped circles!!


These two pages, were designed with a radio theme -- which was a special request.

Wish, dream and believe!

Shine: Leave a little sparkle where ever you go!

and finally the box:

Since yellow and purple were to be the main colors, I had to use elements and papers from different collections to make this scrapbook / memory book.
The main collections / cardstock used are:
Enchanted - Simple Stories
Dotted Essentials - Artful Crafting

Beauty Seven - Authentique

Happy Crafting!
~Saba


Saturday, September 19, 2015

Tutorial: Playing with Alcohol Inks

Today, I will be sharing a three part video tutorial, showing you how to make the above tag. Ok, so 3 parts does not mean really long videos, these are under 4 minutes each and divided as per the stages;
Background, Elements, and Putting It Together.
(Please note that I wasn't able to do the voice over this time, but I have added captions. I've tried to make these as comprehensive as possible, and tried capturing details like, mounting and inking stamps, mounting the felt pad, and fussy cutting etc)

Here they are:

Part 1: Creating Backgrounds with Alcohol Inks 
(No audio instructions, captions only: To avoid listening to background noise, please mute)


Part 2: Creating Elements with Alcohol Inks
(No audio instructions, captions only: To avoid listening to background noise, please mute)


Part 3: Putting It Together
(No audio instructions, captions only: To avoid listening to background noise, please mute)


List of Supplies used:

Alcohol Inks: Rasberry, Bottle and Cool Peri 
Alcohol Ink Metallic Mixative: Silver
Blending Solution
Felt Pads
Alcohol Ink Cardstock
Tags
Archival Ink- Jet Black
Bo Bunny Floral Stamp
Prima Finnabair Bubbles Stamp
Inkadinkado Thanks stamp set
 
If you have any questions, just post them below and I will respond as soon as possible inshallah!
Happy Crafting!


In response to Jiya's question:
Memento, Archival and StazOn stamped on a glossy surface, inked with Alcohol ink.

Wednesday, September 16, 2015

ACDT Post: Inky Tag

Hello lovelies!
Challenge 6 is up, so hop over to Artful Crafting's blog and link up your projects.

So before I describe my project, which basically is a very simple inked tag, let me share my kit with you.

Ok, so I basically started by first adding a few drops of ink; Rasberry, Bottle and Cool Peri, onto the felt pad, after mounting it on the blending tool. Then, I randomly dabbed the ink all over the Alcohol Ink cardstock, till I was satisfied with the result. I then added some Silver mixative, in the same fashion, to further enhance the background. Once dry, I splattered some blending solution over it, then cut it to size, and used it as background for my tag.

For this awesome glittery heart, I just dabbed Rasberry over the glitter.

Stamped the sentiment, which looks embossed, even though it isn't.

and thats all folks!


Supply list:
Alcohol Inks: Rasberry, Bottle and Cool Peri 
Alcohol Ink Metallic Mixative: Silver
Alcohol Ink Cardstock
Tags
Blending Solution
Felt Pads
Rock Candy Glitter 

Happy Crafting

Wednesday, September 2, 2015

All Inked Up

Hello, creative people!
Have you ever explored with a trio of distress inks, crackle paint, and heat embossing on an MDF base? Well, I did, and I was very happy with the result.

I am sure you would agree, that one of the most amazing features of distress inks is its reaction to water. The gorgeous natural patterns that water droplets create when coming into contact with distress inks, is pure beauty.

After inking the 8" by 12" MDF alphabet base with Black, Pine Needles, and Denim Faded Jeans, I painted some sections with distress crackle to add more texture, and added gold micro beads for an antique look. Then stamped and heat embossed some more elements and sentiments.


Challenges:
The Craft Place - Mixed Media Anything Goes
Craft Your Passion Challenges - Always Anything Goes
Incy Wincy Designs - Anything Goes
Simon Says Stamps - Trio of Colors
Simon Says Stamp Monday Challenge Blog
Related Posts Plugin for WordPress, Blogger...