
Hello lovelies, its the second Saturday of the month, and I am delighted to share my projects for Artful Crafting Moodboard Challenge 13.
So I did two projects this time, a card and a 12"x12" layout. I tried, I really tried, to capture the entire process on camera, but my camera wasn't too happy about recording it all. [I am looking into buying another one now, and would love your feedback, recommendations, and suggestions.]
Lets begin with the moodboard and kit:


Our theme is "Layers" and as you can tell by the moodboard, its all happy, colorful, and festive.

I'll start with the card, as that was the first project I worked on. The below video shows you practically everything, except the part where I add UTEE to the frame, and smear it with stickles.
The red dots are liquid pearls, outlined with a gel pen. [All supplies listed in the end.] The inside of the card looks like this:

The second project is a 12x12, bright and colorful layout.

In the video below I have managed to capture how the texture was added.
The rest was pretty simple--just adding the layers.

Once the base was dry, I layered the polkadot frame just like I layered the star one, and stuck the round "Hooray" sticker from the sticker sheet, in the center of the frame.

These presents looked so cute! so I decided to stack them next to the frame. I fussy cut the yellow and dotted ones, and then added some highlights to each with color pencils. The below picture shows you the difference that made.

Can you see how it added some dimension, and just made it appear brighter.

Once done, I simply stacked them along the side, with some other elements like stars, flowers, and ribbon.
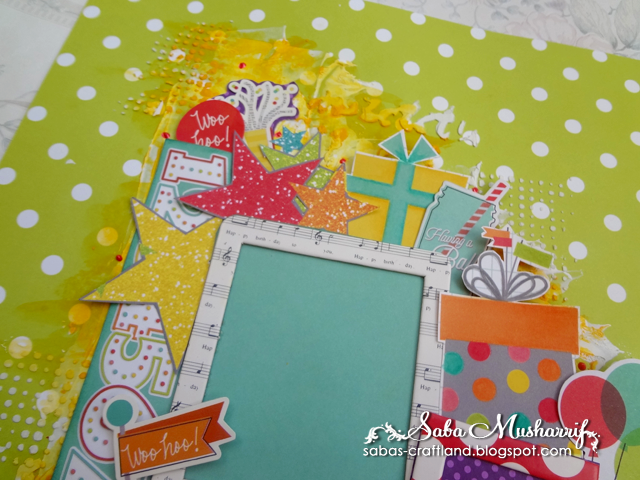


BTW: The frame has a opening on the top allowing you to slide in a picture.
And last but not the least, I intend to giveaway both the card, and layout. If you are interested please mention so in the comments; if there are more than one people interested, I'll pick randomly. Thanks
Supplies:
Distress crayon: Mustard Seed
Liquid Pearls: Ruby Red
Sticker Sheet: Simple Stories - Let's Party
Cardstock: 12"x12" Simple Stories - Let's Party
Cardstock: 8"x8" Artful Crafting - Dotted Essentials Cup Cake Assortment
Cardstock: 6"x6" Simple Stories - Let's Party
Cardstock Die Cuts: Simple Stories - Let's Party
Chipboard Frames: Simple Stories - Let's Party
Mulberry Roses: Artful Crafting - Tangarine [medium], Burgundy [small]
Glitter Glue: Ranger - Star Dust Stickles
Embossing Enamel: Ranger - UTEE Clear
Brads
Ribbon

So I did two projects this time, a card and a 12"x12" layout. I tried, I really tried, to capture the entire process on camera, but my camera wasn't too happy about recording it all. [I am looking into buying another one now, and would love your feedback, recommendations, and suggestions.]
Lets begin with the moodboard and kit:


Our theme is "Layers" and as you can tell by the moodboard, its all happy, colorful, and festive.
I'll start with the card, as that was the first project I worked on. The below video shows you practically everything, except the part where I add UTEE to the frame, and smear it with stickles.
The red dots are liquid pearls, outlined with a gel pen. [All supplies listed in the end.] The inside of the card looks like this:
The second project is a 12x12, bright and colorful layout.
In the video below I have managed to capture how the texture was added.
The rest was pretty simple--just adding the layers.
Once the base was dry, I layered the polkadot frame just like I layered the star one, and stuck the round "Hooray" sticker from the sticker sheet, in the center of the frame.
These presents looked so cute! so I decided to stack them next to the frame. I fussy cut the yellow and dotted ones, and then added some highlights to each with color pencils. The below picture shows you the difference that made.
Can you see how it added some dimension, and just made it appear brighter.
Once done, I simply stacked them along the side, with some other elements like stars, flowers, and ribbon.
BTW: The frame has a opening on the top allowing you to slide in a picture.
And last but not the least, I intend to giveaway both the card, and layout. If you are interested please mention so in the comments; if there are more than one people interested, I'll pick randomly. Thanks
Supplies:
Distress crayon: Mustard Seed
Liquid Pearls: Ruby Red
Sticker Sheet: Simple Stories - Let's Party
Cardstock: 12"x12" Simple Stories - Let's Party
Cardstock: 8"x8" Artful Crafting - Dotted Essentials Cup Cake Assortment
Cardstock: 6"x6" Simple Stories - Let's Party
Cardstock Die Cuts: Simple Stories - Let's Party
Chipboard Frames: Simple Stories - Let's Party
Mulberry Roses: Artful Crafting - Tangarine [medium], Burgundy [small]
Glitter Glue: Ranger - Star Dust Stickles
Embossing Enamel: Ranger - UTEE Clear
Brads
Ribbon


