Showing posts with label Card stock. Show all posts

Saturday, January 18, 2014

Altered Canvas: Cherished

I have, for a very long time, been mesmerized by Gabrielle Pollacco's altered canvas projects. After much deliberation I finally mustered courage to take on one such project. I was very happy with the results.

To complete the project I used multiple layers of cardstock. The flowers were in three shades, light blue, yellow and pale yellow, the alphabets were plain black (treated to seem like epoxy), and the vines were white chipboard (inked).


The flowers are inked and molded to give a 3D impact. Did not want them flat.

Now because this is cardstock, to make them durable they were first coated with layers and layers of home-made Mod Podge, then left to dry. Once dry they were layered and positioned on the canvas as desired.

The photomat is easily replaceable; you can use it to add a photo of your choice, or a quote or anything you like. Its basically a place holder.

And lastly, the canvas was securely packaged in a box.
And thats it! My first post for 2014 concludes. =D

Happy Crafting!

Tuesday, April 16, 2013

"Jazakallah Khair" (May Allah reward you with good) Card

At Favors & More there are, alhumdolillah, a whole lot of projects that I get to work on, and each is special in its own special way. Today I am sharing another recently completed special project.

Though this seems like a very simple card, there was a lot of thought and brain storming involved in making it.

When you are crafting something for someone, it always helps to know details about the purpose of the gift and a bit about the recipient. The fun part of this project was that I was given sufficient information about who this card was for, why it was being given to them and a general idea of the recipients likes.

What made this project challenging was:
i. The fact that it was for someone who did a deed purely for Allah's sake,
ii.The task of coming up with something, atleast, a fraction as beautiful as the sentiment specified,
iii. The task of graciously expressing gratitude, felt by the client, for the recipients very noble deed.

Just like every project, this one too required translating the clients love and gratitude through the final piece, but I wanted to go the extra mile on this project, simply because of the reason behind it. I wanted it to be unique and treasured.

The sentiment "Jazakallah Khair" had been specified by the client, so after much thought and contemplation I decided on the base color as off-white, to represent purity merged with warmth, and a hint of rose pink -pink for the lady. A butterfly to signify joy, flowers to show gratitude, and pearls for purity.


This has been one of the most satisfying projects that I have had a chance to work on. Extremely thankful to the All Mighty Allah, and my treasured clients for giving me an opportunity to be part of such extraordinary moments.

PS: I am posting this card as an entry to the "Challenge #217 'In The Sky' " too, as it meets the challenge requirements =)

Happy Crafting,


Wednesday, July 4, 2012

Round Altered Jar: Beauty and the Beast

Today as I made my way to the craft area, I was distracted by a huge stack of discarded old story books sitting in a corner. As I began going through them, an idea popped into my head, why not use one of these for my altered jar project!  and that is exactly what I did.

You can call it an Altered Jar project or a Recycling project; your call :)


All you need for this project is:
  • Box / Jar
  • Picture
  • Sentiment
  • Some trim and ribbons
  • Contrasting cardstock

I used an empty Body Butter jar, washed and dried. I removed the top label too made it nice and clean. And the story book I chose was Beauty and the Beast. I cut out the picture of Belle and the prince for my project.

Next came the sentiment; I didn't want a simple rectangle, so I traced out the desired tag shape making sure that it covers all the text, and nothing is cut off.

 Once that was done all I did was cut it out as accurately as possible.
This was the hard cover, thus extremely difficult to cut; but where there is a will, there is a way. The rough edges did not worry me much because I was going to distress them, and thus they would not be very obvious.

Next came the layering. Layering in my opinion is one of the simplest yet most beautiful technique. It adds a lot of definition to a project. I used, roughly 4 layers, not including the picture in this count. A close up of the layers below.
The Kraft paper board layers were used to give the project a strong base. So I went ahead and embossed them, just to add some body to the board.


Once embossed they were distressed with Vintage Photo for depth and color.


In the above picture, can you notice the difference between the two? the top piece is distressed while the bottom one isn't. Well, I distressed both for the project.

Next came the organizing; putting it all together without actually sticking it, just to see how it looks and tweak it before gluing it down. This is an essential step!


Adding some floral sprays; no project is complete without them, now is it! This looked pretty good me thought. With the top done, it was now time to focus on the sides.


I was pretty decided that ribbon and trim would look best so I went ahead and began gluing it down.


Starting with the ribbon and then layering it further till I liked what I saw:


Next I glued the Kraft base to the jar, and added beads to embellish it further. Also added a cute little bow for finishing.


Once this was done the project was fairly over, glued down the top as was arranged earlier and embellished it with beads and rhinestones. Below is what the finished product looked like..


From an empty useless Body Butter jar to a cherished Keepsake!

Saturday, February 18, 2012

Another Scrapbook In the Making!

Peace be upon you!

Just wanted to share some of the pages of another scrapbook that I have been working on; and this time its a chipboard scrapbook, with a very different shape. Lets just say I designed this one myself ;)

It is approximately 7" x 6", with the DCWV black currant theme (that is black, pink, grey combination). Video with the details on the cardstock, embellishments, stamps will follow completion.

I've experimented with lots of fun techniques in this scrapbook which I look forward to sharing with everyone.


 I plan on working on the cover right at the end, so here is the first page; it has an acetate pocket which is embellished with bling flourish from Prima. There are 3 tags, and there is lots of room to add many more. The tags are embossed, and inked.

Here is another page with a small foil pocket, which holds a cute little tag. Some more heart bling here with trim and foil accents.

I am super happy with how this turned out. These are double pockets with spacious photo mats. I designed this to hold 2 photo mats, BUT you can easily fit 3, and the two pockets turned into three as I was putting them together... haha what fun that was.

There are many more pages to go, which I must complete in the coming week. I'm pressed for time with an upcoming exhibition, but loving every minute!

So happy crafting.
and stay tuned!

As always queries are most welcome sabascraftland@gmail.com.


Wednesday, October 12, 2011

Acrylic Resist! Finally :D

Peace be with you!


I am really excited about sharing my newest project this Wonderful Wednesday. I finally got around to implement what I learnt from Beate's tutorial. I cannot begin to tell you how eagerly I looked forward to trying out the acrylic resist technique. Every week I planned to do it, and every time something came up...I just wasn't able to get down it, and then it happend! yay!!

Here is the first look; the beauty in all its glory.
I just love the end result!


So basically all you need for this particular card is white cardstock; yup, that is correct, just plain white card stock (you can of course use whatever you like, the point is that you can make something like this with just the basics). I did not use any colored paper, or patterned paper time; just distress inks and acrylic paint.


This is a square card, the stamped with inkadinkado (that is such a cute name :D), and inked with Tim Holtz's distress inks. I used the same stamp for the base as well as the petals :). Here is a close up of the flower, it is the same 13 petal flower used for the earlier for the Simple 3D card, slightly altered this time to go with the theme.


I used vintage photo and wild honey for the flower, and worn lipstick for the base. Worn lipstick as you know is a bit on the darker side, and that is one of the reasons why I used it. I wanted to give the card a warm feel, but did not want it to be really dark; so worn lipstick was applied in circular strokes with medium pressure. When working on the flower, you would want to stamp and color the cardstock before cutting out the petals; its much easier that way. Oh, and incase you are wondering about what lies in the center ... well that is puff paint :) pretty puff paint. hehe


Here is a close up of the faux stitch... doesn't that look awesome! I explored with puff paint this time, and it turned out great...I think it looks so much better than the one done with gel pen; but chances of messing up when using puff paint are a lot higher too. 

And that is about it!
Happy happy crafting! (must try acrylic resist ;) )


For further queries email sabascraftland@gmail.com
for purchase write to us at favorsmore@gmail.com or visit Favors & More.

Wednesday, October 5, 2011

A Card for Every Season

Peace be with you!

It is Wonderful Wednesday and I have another of my creations to share with you. I call it the "Every Season" card, simply because of the sentiment used :D. So here is what it looks like:

Isn't it a beauty! and no, you cannot say it aint ;)

So this card is very very different from any of the cards that I have done so far, with respect to the colors and sentiments used. What I like best about this piece is that it can be used for any occassion and it can be given to anyone, young or old :)

I started off with a 4 x 5.75 inch folded white card stock and distressed the edges. The distressing was kept very light because I wanted the center piece to stand out. So, once distressed the based was layered with yellow cardstock to give it dimension.

Then I set this piece aside and began working on the center piece. Started with dry embossing the center piece, and then filling in the color with a light and dark tone of the same shade. For this card I have used "Vintage photo" and "Antique Linen" distress inks. You will start with the lighter shade.

When you get the desired effect, stamp the sentiment. Usually, one stamps before dry embossing, but in this case we do it the other way round. Its totally up to you how you want to do it, I just liked it better this way.

Once the base is ready, you can paste it on to the partially completed card or, you can add some fancy sentiments to it like I have done here.
I made this myself using ribbon, flowers, beads and a brad :) Love how it turned out. All you need to do is to make a 6 loop bow, secure it. Then take flowers of your choice and secure them on the bow as desired; and cover the center with a brand or button. The one I used here is embossed metal. I love it :). Beads at the base of the flowers are optional...i just added them in to give it a finishing touch.

So adhere the sentiment on the embossed card stock first and then adhere that to the base. And your beautiful card will be ready  :)


Happy crafting!
For further details email sabascraftland@gmail.com or visit Favors & More. You can also visit my card gallery.


Wednesday, September 28, 2011

Baby Booties Card

Peace be with you!

I must admit that I enjoy working on baby projects the most, and here is one of my recently completed projects. Its a 3.75" card done in pink and white and embellished with two mini booties :D
Most of the cards that I have done for babies either have prams on them or rattles; I wanted to do something different and challenging for this one though. And it looks so cute!

So before we get into the details here is what the completed card looks like :)

This is a fairly simple card to make, and the booties are the only challenging part :P... so the idea of adding cardstock booties was basically inspired by the booty favor boxes which were the 'IN' thing some time back. I found a template for these at "love bug scrapbooking", which I used as the source and worked on further to get the size that suited by project best. (Since the link to love bug scrapbooking is broken, you can download the template here. updated 31 Jan 2014. If you are still unable to access it, please let me know)


The booties I used on this baby girl card are no less than an inch. I had an option of whether to use paper or cardstock for doing these. Paper is definitely a lot easier to cut and mold BUT given that this is a card, which would surely be placed in an envelope and would go in many hands I wanted to ensure that the booties retain their original shape and therefore I used heavy cardstock (around 110). Since these were really small embellishing them was quite a task. To avoid making a mess, I added a bow to each and outlined it in silver. For the clasps I used puff paint. Once the booties were done the rest was fairly simple.


Layer the patterned paper as desired, and glue it on. If you do not have patterned paper of your own, you can always create some using stamps, paints, markers, crayons etc the options are endless. I made my own patterned paper for this project using acrylic stamps.


OK, so as you can see above the booties were placed on a dry embossed scalloped circle and embellished with organza and satin ribbon ... and Tada! you have a totally awesome card :)

For further queries and tips email sabascraftland@gmail.com
for purchase write to us at favorsmore@gmail.com or visit Favors & More.

Wednesday, September 21, 2011

A Simple 3D Card

Peace be with you,
I'm blogging after a fairly long break; sincere apologies for that. Actually my love for working with different mediums led me to playing around with dough; (yes DOUGH) and guess what! my oven blew up :P

Coming back to today's post ...I wanted to create a card which was simple yet unique.

If you have had a chance to browse through the collection of cards posted on my facebook page, you would notice that the cards are not very heavily embellished. This time round too I have kept the theme very simple, added a 3D effect and used the white cardstock as the base for this card.


To avoid adding too much color, I stuck to shades of lilac on this. The darker shade has been added strategically to highlight and bring out the lighter color. If you look closely at the picture below you will notice that the outer petals are dark, while the center is lighter.
To add detail, the darker petals were outlined with faux silver stitching. The lighter petals are however done with embossed lilac cardstock; so the embossing seems like veins on the petals :)
This beautiful flower gives the card a 3D feel; (obviously, cause the flower is 3D :D ) made out of 13 petals. I will be doing a tutorial on how to make this flower in the coming week or two.

Next, some lilac rose buds and a bow were added to accentuate the flower and to give it a soft/warm feel. :)

I made the greeting look like it was written on a scroll...not exactly a scroll scroll... but just wanted to give it that look. This technique is very simple and easy to do. Just distress the edges of the cardstock, stamp the greeting in the desired color, and then carefully curl the edges using a quilling tool or your fingers. Once done just stick it where you want.

TIP: Plan the layout and embellishments before assembling such a card. We have worked directly on the cardstock base, so a slight error would ruin the entire card.

Happy Crafting :) 

Friday, August 19, 2011

Sharing My Favorite Cardstock from DCWV

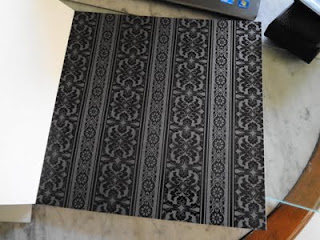
Today I want to share with you my all time favorite DCWV cardstock, which I have been saving for my upcoming projects, and it is "The Black Currant". It's a 12" x 12" stack with absolutely beautiful acid - and lignin-free prints, accompanied by some brilliant foil paper too. (Acid and lignin free card stock last longer and by longer I mean really really long, that is because both these components damage the paper in the long term and thus their absence gives it longer life)

I am based in Pakistan, and though there is lots of amazing stuff available here; these gorgeous stacks still haven't arrived, so I had to have these shipped in with the help of my utterly sweet friend 'Janiece'. I will keep posting on other designs as I roll out projects using them, for now, its Black Currant.

Here are 3 of the sheets that I REALLY like, and most probably these are the ones I will be using; I'm a bit confused so, most probably these will be the ones. Sharing them here to give you an idea of what to expect :)

This one is foil... isn't is sooooo pretty!


These aren't just stripes, its like these are embossed


Oh! I'm so in love with this one *sigh*


So coming back to "Black Currant," the possibilities with this rich card stock are endless! and I am eagerly looking forward to complete my 'keep sake' box project so that I can share it with you. Most of the projects I've seen using "Black Currant" are either wedding cards, scrapbook pages or wall hangings; so mine will be the first of its kind.

I will be taking pictures as I progress through the project so that it can be converted into a tutorial for future reference.

PS: I love DCWV and I'm sure you guessed that seeing the *blinkie* on my blog.
Anyone in Pakistan/India/UAE interested in this card stock shoot me an email sabascraftland@gmail.com

So after I was done with this post, I realized the above pictures did not do this beautiful stack justice; so here are some more pics :)


These are just a few! don't forget to email sabascraftland@gmail.com if you need some :)
Related Posts Plugin for WordPress, Blogger...