Showing posts with label card. Show all posts

Wednesday, July 25, 2018

Congratulations on Baby Girls Arrival


As you all must have noticed, it is that time of the year when most people are blessed with cute little people, who brighten the world. So the card I am sharing today, was made to congratulate new parents on the arrival of their baby girl.

You can watch the entire process on my youtube channel


For this card I have used the Spellbinder Tiara Rondelle die, along with the Nestibilities Circle.

Happy Crafting!


Monday, April 23, 2018

Ramadan 2018: Card Tutorial


With Ramadan only 23/24 days, I decided to make some fun vibrant, Ramadan Kareem cards for loved ones. I captured the entire process on video, to share with everyone, so that you too feel inspired to make some of your own.


In this video tutorial I have used stamps from Altenew, Kaisercraft and Prima Marketing Inc. Instead of using distress inks, I opted to use pigment inks, by Color Box, and black Archival Ink.


Have a wonderful day!


Tuesday, January 9, 2018

You are Incredible


This card is inspired by all the incredible people, those precious gems, who make life beautiful. 

The front panel is actually a bookmark design, which I water colored some time back.


As you can see in the above picture, its actually a pretty long panel, and so I used half of it for this card. I created the base layer by stamping the edges to create the border, and the then stamped the sentiment on Kraft card.


Added some glossy accents to add dimension to the design.


And thats all folks!

Linking it to:
Stamps Fun Creativity : 315
Dream Valley Challenges : Challenge #170
My Creative Scoop : Color Inspiration Monthly Link Up 30

have a great day, and happy crafting


Wednesday, July 19, 2017

A Chai-some day!


Beautiful Chai-some day in Karachi today! [Chai = tea]

Loving every bit of it, alhumdolillah. On such beautiful rainy days, I like to indulge in some craft fun, and so I watercolored this sketch that I had purchased, a few years back, from Phuljari designs. And then transformed it into a cute card.

Water coloring sketch of teapot from Phuljari designs

I used the Pelican water colors for this. Beautiful bright colors.
Once colored, I simply cutout the elements, and layered them to make this card.

Tea , Chai-some , close up of tea pot, desi

Stamped the sentiment using archival ink.


Added some elements on the inside too.

Linking my card to:
Crafty Card Makers: #193 Lots of Layers
Making Memories : #7 Anything Goes / Anything but Square

Wishing you a chai-some day!
Happy Crafting


Thursday, June 29, 2017

Happy Wedding!


Today I am sharing a card, inspired by the Altenew June challenge image (you can find the image at the bottom of the post.)
The challenge required a white on white focal point; so I started by embossing a bunch of white roses using the Vintage Roses stamp set, on to white cardstock. Then, I added gradient to the background using Altenew Inks (Grapevine, Ruby Red) and Distress Ink (Antique Linen). Added layers of white embossed, and plain white diecut vellum to the embossed bunch, along with a stamped sentiment.


Linking my project to:
June 2017 Inspiration Challenge - White on White Focal Point

Have a great day, and happy crafting!


Tuesday, April 11, 2017

The Butterfly Card

Here I am today, sharing another one of my projects. It is a simple card, which I have embossed using my scoreboard, and then inked, to create the gorgeous background.
I am so in love with the colors. The butterfly is die cut from one of my Gelli prints.

I did capture the entire process (except the Gelli Printing bit) on camera.
Youtube link below.


 Linking my card to:
My Time To Craft!: Challenge 343
Crafty Cardmakers: Challenge 186

Happy Crafting!

Thursday, March 23, 2017

Hello Gelli !


Gelli printing was the first new technique I learnt this year, and I am excited to share my first project with you. I had heard about gelli printing in the past, but never had a chance to explore it, until January when I attended a workshop on "The Magic of Gelli Printing" hosted by Shereen.  It was a great experience and we learnt lots of fun techniques. I finally got around to playing with my Gelli Plate last week and below are the two prints I pulled.

I decided to move forward with the ghost print, and cut out five circles from it.

To be honest, I was planning to make flowers out of these prints, but the die cut circles looked so pretty that I dropped the idea.
To add some dimension, I went ahead and inked the edges. Don't they look like planets!
 To add some more depth I faux stitched each, in black. The whole idea behind sharing these 3 steps, is to highlight the difference each detail makes. It adds so much interest to the project.
Next I took a black square card, and arranged the circles on it, to get an idea of the arrangement. Then I went ahead and added some texture to it with paste, and pigment ink.
Next, I stamped some swirls in the background, and on the die cuts. Adhered the die cuts to the base, and cut out a heart to be placed in the center. Heat embossed 'Gratitude'.
Added some micro beads, and it was complete!

Until next time, Happy Crafting!


Monday, September 12, 2016

Eid Mubarak!

Altenew Eid Greetings

Wishing all of you a blessed and happy Eid!
~Taqabballahu minna wa minkum~
~May Allah accept it from you and us~

This Eid, I had the pleasure of making Eid cards in the colors of the MSA logo; navy blue and white. For the center focus I used the Altenew Eid Greetings stamp set, and water colored the image.


The sentiment was heat embossed in Silver, and my little nephew Zubayr dry embossed the white base, and layered it onto textured blue card.


Oh we had lots of cards to make, and I would not have been able to complete these in time, without the super awesome Zubayr <3. By the way, the video above... that too was recorded by my little angel. =D
 
Altenew Eid Greetings, Spellbinders Medallion embossing folder
And this is what the finished cards looked like.

Sending lots of love and prayers your way, this Eid.
Happy Crafting!


Thursday, July 28, 2016

Gray and Blue

blue gray, Scrapiniec, handmade flower card

Blogging after a fairly long time! Today I wanted to share this card, the color theme for which is inspired by the work of the very talented Erum Tasneem.
It is a blessing to be surrounded by creative and inspiring artists.

The background is heat embossed, the frame is Scrapiniec chipboard 
blue gray, Scrapiniec, handmade flower card

and the flowers are handmade.

Happy Crafting!

Saturday, May 14, 2016

Lets Party!

Hello lovelies, its the second Saturday of the month, and I am delighted to share my projects for Artful Crafting Moodboard Challenge 13.


So I did two projects this time, a card and a 12"x12" layout. I tried, I really tried, to capture the entire process on camera, but my camera wasn't too happy about recording it all. [I am looking into buying another one now, and would love your feedback, recommendations, and suggestions.]


Lets begin with the moodboard and kit:


Our theme is "Layers" and as you can tell by the moodboard, its all happy, colorful, and festive.


I'll start with the card, as that was the first project I worked on. The below video shows you practically everything, except the part where I add UTEE to the frame, and smear it with stickles.


The red dots are liquid pearls, outlined with a gel pen. [All supplies listed in the end.] The inside of the card looks like this:


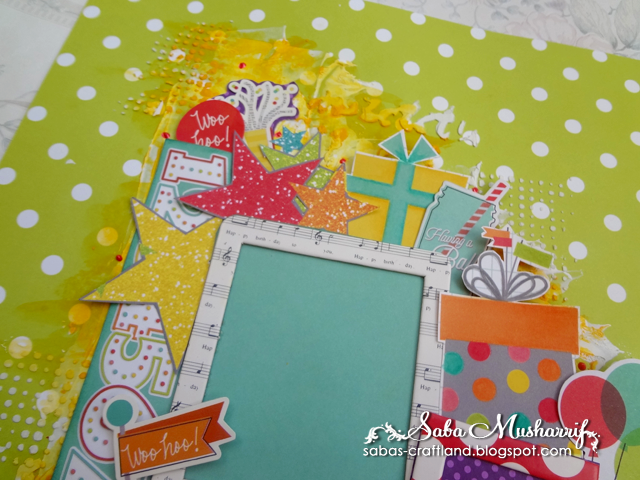
The second project is a 12x12, bright and colorful layout.


In the video below I have managed to capture how the texture was added.


The rest was pretty simple--just adding the layers.


Once the base was dry, I layered the polkadot frame just like I layered the star one, and stuck the round "Hooray" sticker from the sticker sheet, in the center of the frame.


These presents looked so cute! so I decided to stack them next to the frame. I fussy cut the yellow and dotted ones, and then added some highlights to each with color pencils. The below picture shows you the difference that made.


Can you see how it added some dimension, and just made it appear brighter.


Once done, I simply stacked them along the side, with some other elements like stars, flowers, and ribbon.


BTW: The frame has a opening on the top allowing you to slide in a picture.


And last but not the least, I intend to giveaway both the card, and layout. If you are interested please mention so in the comments; if there are more than one people interested, I'll pick randomly. Thanks

Supplies:
Distress crayon: Mustard Seed
Liquid Pearls: Ruby Red
Sticker Sheet: Simple Stories - Let's Party
Cardstock: 12"x12" Simple Stories - Let's Party
Cardstock: 8"x8" Artful Crafting - Dotted Essentials Cup Cake Assortment 
Cardstock: 6"x6" Simple Stories - Let's Party
Cardstock Die Cuts: Simple Stories - Let's Party 
Chipboard Frames: Simple Stories - Let's Party
Mulberry Roses: Artful CraftingTangarine [medium], Burgundy [small]
Glitter Glue: Ranger - Star Dust Stickles
Embossing Enamel: Ranger - UTEE Clear
Brads
Ribbon


Related Posts Plugin for WordPress, Blogger...