Wednesday, March 30, 2016

Scrapbook: Frozen

A couple of months back, I had the pleasure of making a Frozen themed scrapbook for little Zaynab. For the cover I decided to add a picture of all the characters, with a snow topped plaque, that reads Zaynab.


Tried to capture the slight shimmer added to the snow, but failed miserably. (PS: the "snow" might look soft and foamy, but it actually is pretty hard and long lasting. Happy with my recipe)

Below I am sharing some of my favorite pages:


Keeping her age in mind, I added a little photo wallet, accordion style photo mats, and tit-bits which I felt she would enjoy.


 Keeping in theme with frozen, and snow, I covered the edges of the box with snow too.

Chipboard picture frame added to the box, so Zaynab can add in here picture there too.
She loved the album, and so did all her friends at school. 
Her aunt shared a picture of the name banner I had made for her when she was tiny, hehe, she still has it up in her room. <3

I love the colorful seabed too!
Happy Crafting!!

Saturday, March 12, 2016

Foil and Flowers

Its spring! Let the flowers blooms <3

The theme for Artful Crafting Challenge 11 is Flowers, and so my project has lots of flowers on it.
I begin with my super fabulous Kit (and speaking of Kit, AC has started its Kit Club and the Spring Kit is up for grabs)


I was so excited to see the Thermoweb Rainbow Deco Foil, and the Thermoweb Deco Foil Adhesive in my Kit! These are so easy to work with and the results are simply amazing.

For the background I stenciled the Thermoweb Deco Foil Adhesive onto an off white base. Now before you start using the adhesive, please unscrew the top and remove the seal.


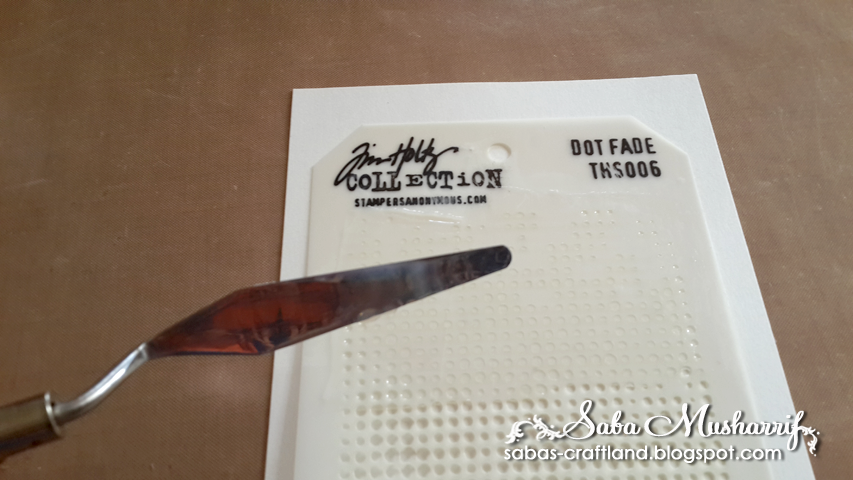
I layered the Tim Holtz Dot fade stencil onto the cardstock, and applied the adhesive over it with a painters knife.

I spread the adhesive evenly over all the required area. Once done I removed the stencil carefully, and soaked it in water immediately. To ensure that the stencil does not get spoilt, wash it immediately.

Once done, the adhesive needs to dry. As per the instructions, it dries in an hour, but in my case it dried in 10 minutes. I believe the weather, and thickness of the adhesive layer, impacts the drying time.

It is worthy to note here, that unlike other adhesives, the Thermoweb Deco Foil Adhesive stays sticky after it dries, and it is the stickiness that adheres the foil to the design. Each tube of Thermoweb Rainbow Deco Foil contains 5 sheets, and these are pretty thin sheets, so to be safe, when you take one out check ensure its just one and not two.


Next, I covered the adhesive base with foil, as seen above. When adhering the foil, please be sure that the bright shiny side is facing you. Then, gently rub over the foil to ensure it adheres well. I would not advice anyone to use a ruler, or a scoring at this stage, and avoid pressing down too hard on the foil, as it would make the adhesive spread and spoil the design.

Once satisfied, I gently peeled off the foil. Now, if you feel that some areas haven't foiled properly, just rub the foil over it again. As long as the adhesive is sticky, the foil with cover whatever area is left.

I was happy with how it turned out! its so simple and easy.

Now for the Gerbera Daisy, I used the spellbinders die which too was part of my kit.

Using the die, I cut out 16 petals each, 4 large and 2 small petal bases, and 2 centers. These dies make the task of flower making super simple. Just take each petal and push it through each slit, the large and medium petals go in the large base, while the small ones go into the small base. You can add glue to the tab on the bases, and stick the petals down as you push the petals in.

This is what they should look like. By the way, I cut the petals out of MME Look At This, and the petal bases and centers from  American Crafts Banana, textured cardstock.

Next, I shaped the petals lightly, which isn't necessary but I like shaping them. I simply flipped the layer over and shaped the petals with inward strokes. Did the same for the centers to curl them up. Next, I just stacked the layers one on top of the other and glued them down.


Last but not the least, I selected 2 purple Lillies, 1 pink Lilly,  2 pink rosebuds, and 3 leaves from the bunch of amazingly beautiful mulberry flowers, and arranged them over a decorative frame cut out of MME This Moment, which I adhered to the foiled base. Next I added a sentiment to finish it off.

A couple of close ups below:
 

Supplies Used:
Thermoweb Rainbow Deco Foil
Thermoweb Deco Foil Adhesive
Spellbinders Gerbera Daisy
MME Look At This
MME This Moment
American Crafts Banana
Purple Lillies
Pink Lilly
Pink rosebuds

Hope you enjoyed reading this post, looking forward to your entries to Challenge 11

Happy Crafting!
 

Friday, February 26, 2016

Scrapbook: Happily Ever After


Happily Ever After was the title of a love themed scrapbook that I made for a lovely client. The color theme was derived from the beautiful Bo Bunny Love & Lace collection (That is the collection I used along with another one), while the layouts were similar to the Wedding Themed scrapbook shared earlier.

Scrapbooks are more like interactive books, if you ask me, and so I try to add some fun elements in all scrapbooks that I make.
For this one I added cute detachable coupons to each page, along with the usual tags, mats, flipbooks. 
Pictures of the pages follow:


I love the above pocket! The Altenew vintage roses stamps tie in beautifully with Love Lace. 


For orders and queries please email favorsmore@gmail.com [thats my business email]

Have a great day and happy happy crafting.


Saturday, February 20, 2016

Layers of Colors

Sharing today, an easy way to create simple backgrounds by using one stencil, and as many colors are you wish!

Our challenge theme for February is Love, so the stencil I've used is Staggered Hearts by MFT.


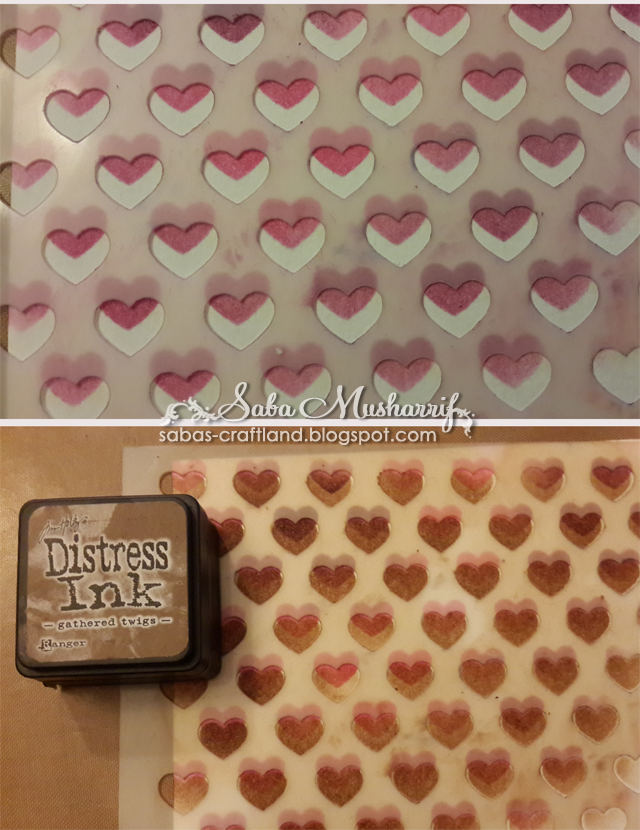
So, I started off by placing my stencil on water color paper, and inking the hearts with Picked Raspberry (my new hot favorite), and Seedless Preserves. Once done, I shifted the stencil down to create overlapping hearts in a darker color, as seen in the image below.

Gathered Twigs was the next color I chose.


Gathered twigs being the darkest color, comes through as the most dominating color, while Seedless Preserves and Picked Raspberry appear as shadows. Note: The heavier you ink the top layer, the more opaque the front layer appears. I loved how the background looked at this point, but wanted to add some more color, to fill the white spaces.

 I bumped the stencil to the left, and added some Mustard Seed. It looked pretty complete at this stage.


I wanted to keep this card really simple, so stamped the sentiment (from MFT Love You More) on vellum, secured it to the background, and layered the finished piece on Kraft card.


Now to add some more interest to the hearts, I wet my paint brush, and randomly added some strokes to each heart, causing the distress ink to lighten, and adding more dimension. Close Up below


Lastly, I covered around five hearts with Glossy Accents, just to make them pop a bit.

and that's all folks!
Happy Crafting!


Saturday, February 13, 2016

High on Love!

And its playtime!
Sharing with you today, this cute little card which I made using supplies from AC's February kit.
 
The cardstock is from My Minds Eye, with beautiful designs on both sides. http://artful-crafting.com/shop/my-minds-eye-my-story-double-sided-foiled-cardstock-12x12-days-remembered/

So coming to how I made the card. I started with a piece of white water color paper (Canson), layered it with the MFT Love stencil, and secured both onto my craft sheet, as seen in the picture below.

Using the blending tool, I then inked the background using Picked Raspberry, and Worn lipstick distress inks, from Tim Holtz, Rangers. Next, I stamped the cute hedgehog (Love Flight by Penny Black) onto a fresh piece of watercolor paper, so I could color it in.

As I had planned to color the image with watercolors, I used the archival black ink to stamp, so that it does not bleed while coloring.

The colored image was cut out  using scissors, and I was all set to put the card together.
For the base I used a blank, hot pink card and envelope set, which I received as a gift from Artful Crafting with one of my orders. I layered the base with a piece of MME My Story, and the inked "Love" layer created earlier. Next I added the "xoxo" tab, and frill, from the Doodle Bug Sweet Heart stickers, followed by the colored hedgehog.


And that's all folks!
Now please hop over and link up your project to Challenge 10: Love.

Happy Crafting!

Related Posts Plugin for WordPress, Blogger...