Wednesday, March 6, 2013

Craft March: Project 5 - Flower Tutorial

My project for today is slightly different from the previous 4. This project is linked to the Craft March Challenge in a way; I've done a video tutorial on how you can make a 13 petal 3D flower with a button center. (This tutorial was long over due and I'm glad to have finally done it). 


Used the same flower with a different center for this card too. I had done about 150 of these flowers for a baby announcement project in 2011 :D


Video Tutorial


Pictures and Instructions (for those who can't access the video)

1. Cut out 13, 1" hearts. Each heart will be used for the petals. (Heart is not a must, can be any shape that is broad on the top and narrow at the base)


2. Cut out a rough circle; this will work as the flower base.


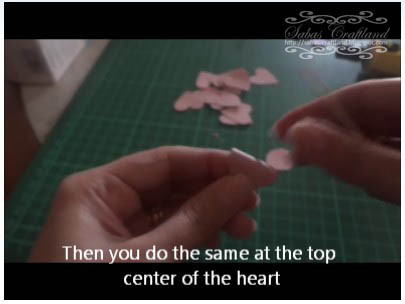
3. Shape the petals using a stick or any smooth surface object.

- to shape first wrap and roll one side of the heart half way


- then the other side

- then do the same at the top center


- then dent the petal in the center so that it sits up


- repeat for all 13 petals

4. Glue down the petals. 2 on opposite side, and then 2 on the remaining sides. Like a cross. This is your first layer with 4 petals.


5. repeat the same to form the second layer and then the third layer


this is what it looks like after the 3rd layer completes:


6. Position and glue the last two petals to balance the flower.


Now take a button and glue it to the center.


Your flower is ready


Happy Crafting!


Craft March Challenge 1: Design A Gift Holder

After receiving an amazing response on all the projects done so far for the "Craft March," I decided to post the inspiration/ideas before hand so that anyone else interested can take part and share their projects. I will continue posting my daily projects.


Craft March Challenge 1: Design A Gift Holder
Currently Khadija Farooqui from D Creations and I will be posting projects based on the challenges which may be used as inspiration for you to come up with your projects.

Since its a first, we've kept it simple. All you have to do is design a " gift holder" (it can be a box, a bag, basket anything which can hold a gift) using:
1. Any material of your choice
2. Atleast 1 embellishment (flower, butterfly, charm, anything)
3. It should be big enough to hold something (a locket, chocolate, or any gift)
4. Join our blog and share your project pics along with a brief description (10 lines max) with us.

We will post a new challenge on Monday 18th inshallah. So this one must be completed by 13th, Wednesday. The projects shared will be posted here, with your tag.

(Khadija and I will be posting our completed projects here tomorrow inshallah)


A winner will be selected based on originality, and techniques adopted and explained in the description. The winner will decide on the next challenge in consultation with us.

*This challenge is open to anyone who wants to participate*

For any queries don't hesitate to email sabas-craftland@gmail.com.
Looking forward to hearing from you!
Thank you!

Happy Crafting!

Tuesday, March 5, 2013

Craft March: Project 4 - Just Because

Inspired by Pockets
Challenge - I wanted to do a card without using any printed cardstock and this is what I did.
You can create some beautiful cards using simple plain cardstock too


White base, layered with off white (.25" shorter) and 3 bright pink cardstock pieces (divide the size of the 2nd layer by 3 and reduce each piece further by .25" approx). Die cuts layer the pockets on each side.
Faux stitching on each pocket to add detail.


Happy Crafting

Craft March: Project 3 - Friends Are A Gift

This project was inspired by a challenge posted at Creative Harmony back in September 2012. 70% white is definitely a challenge when you get down to doing it.


The base is white, layered with yellow (which is .25" smaller), layered again with white (which is about .5" smaller that the original white base). Two organza ribbons (one plain while the other is intrically cut) go round the top white later.

Die cuts are placed on the top layer and further layered with yellow and Pixie cardstock. Yellow daisies arranged tastefully, and a bow added to the base.

I did not want to use any bling on this project, so I used puff paint instead for the flower centers.

Happy Crafting!


Monday, March 4, 2013

Doing the Craft March: Project 2 - Thinking Of Your


Technically I am one day behind on projects and two days behind on posts, so this here is the second project that was done in March.

The theme is "Blue without you" in terms of color and sentiment. The sentiment I had closest to the theme was "thinking of you". (Wondering where I got the theme? It was my inspiration for the day as I was missing family) :)

Basically, this is my first blue (color) themed card. I have, surprising, never done a blue card; I did do envelopes cum cards for my nephews on eid, but never a blue card.

Coming to the project, this is a simple card, and layering is the basic technique used.


Happy Crafting! :)

Sunday, March 3, 2013

Doing the Craft March: All Things Grow With Love

There has been a buzz, on my facebook timeline, about March being the month of Craft in PK too, this year round. Seems like the national event has now become international :).  For me its just another opportunity to craft away, :D. With that said, I am trying to roll out atleast one project a day all through March. Its a bit of a challenge in my case, juggling both client projects, and others, but its a start!

So far I have been very happy with myself, 2 craft projects in 3 days- "I is happy with myself."

Sharing the first here:
"All things grow with love"
This is a tag, 3.5 x 6.5 approx
stamped, and embossed


adding 1 more picture; a close up of the hearts and wooden butterfly


 Happy Crafting!!


Thursday, February 21, 2013

From a Simple Shoe Box to a Beautiful Fluttery Storage Box

I strongly believe that "Scraps are a creative minds treasure" -my wise words.

If you are fond of crafting, and you craft frequently you will agree that storage space is never enough. I, for one, am always in need of boxes, shelves, trays etc to keep the work space organized. So when I purchased some shoes recently, I decided to put the show boxes to good use.

This project was done with scraps of completed projected. Nothing new was purchased for this alteration; it was kept simple and all it needed was:
-colored paper
-cardstock
-die cuts (optional)
-ribbon
-glue
-scissors

To begin you need a box, this is what mine looked like:
This is a very sturdy corrugated box. If you look closely you will see 2 slits on the edges, these I wanted to weave ribbon through. *Note: when you begin working on any project it is always best to have a good understanding of what you would like the end product to be like* Because I had planned this project, I knew that when covering the box I had to keep the slits open.

Also I did not want a two piece box; this one was perfect as the lid is attached to the base.


A combination of lemon, yellow and white paper scraps and cardstock was used. The box was covered using yellow as the center, lemon on the sides and white to embellish. I had some left over pale yellow ribbon which was added for the bows.
Covering the box was relatively simple; just like wrapping a gift :) (If anyone needs a tutorial on that just email and i'll post one.)

Here is what it looked like once everything was done.


The inside:
You can see the ribbon going through the slits. Some die cuts added to make it pretty on the inside too :)
 To give it a neat finish the design was carried all the way to the back


And finally the front!


Now you see how useful scraps can be :)
From a simple shoe box to a beautiful fluttery storage box.


Happy crafting!

Related Posts Plugin for WordPress, Blogger...