Saturday, June 25, 2016

Eidi Pockets

Hello Lovelies!
Since Eid is round the corner, I posted a tutorial on these Eidi Pockets so all of you can make some of your won. Hop over to Artful Craftings blog to view the details.
Used the Altenew Ramadan Greetings and Eid Greetings Stamp for these.


Wednesday, June 22, 2016

Roses and Lace

Here is a 6"x6" card, made with the "Coffee In The Arbour" collection, by Maja Design. I am totally in love with their June mood board, and am delighted that I could get the project ready in time for submission.
http://majadesign.nu/mood-board-june/
The lace has been hand cut from Vintage Summer Basics:1899-bs, using Tim Holtz: Lace stencil, (if you are following me on instagram, you must have seen the progress posted :P) It wasn't an easy task, but the results were amazing. I added some details to the hand cut lace, just to make it look a little more delicate.


For the gathers, I've used Grandma's Old Porcelain. The gathers are held up with roses, strung together with a chain. The Eiffel Tower charm, added as a symbol of love.


Added some texture to the top using the same lace stencil, and embellished it with butterflies and pearls. The butterflies were hand cut from Butterflies are Free.

For the base visible through the lace, I've used Surfs Up, which I toned down with Picket Fence paint. An inked up piece of 1899 was added to the bottom corner, with "Congratulations" heat embossed in white.


And that's about it! All the card stock used in this card was received from Artful Crafting as part as my June Kit. All items have been linked, and you can shop them from the webstore, if you please.

Link to the Maja Design Challenge: Mood Board June

Happy Crafting!

Saturday, June 11, 2016

Care For Some Coffee?


Before I begin talking about my project, I would like to wish all of you a blessed Ramadan! May we reap the benefits of this sacred month.


I made this, approximately 6"x6" card using goodies from Arftul Crafting's June Kit.


The theme for Challenge 14 is Rustic, and below is the gorgeous moodboard. You can read more about the challenge, and how you can participate by visiting the Artful Crafting Blog.


My kit included cardstock from the "Coffee In The Arbour" collection, which is designed by one of my favorite companies, Maja Design. I started off with  Lovely Weather and trimmed it 0.25" smaller than the card base. Next, I stenciled Lace using Picket Fence Distress Paint, and set it aside to dry.

 *Please be sure to wash your stencil as soon as you are done; its a task getting the paint off once it dries [speaking from experience]*


Doing so added some texture to the base, and toned it down a bit too. I then diecut two doilies, one from Grandma's Old Porcelain, the other from Raspberry Jam Cookies, and centered them onto the stenciled base. For the pleats, I cut out a 5.5" x 6" piece from Delicious Moments-bs, and creased it by hand. When done, I adhered the pleats to the base and dabbed them lightly with Picket Fence paint, to make them more prominent.
Next, I fussy cut the beautiful coffee spread printed on Delicious Moments, and adhered it to the center along with the tag. Last, but not the least, added some flowers, mini stars, ribbon, and rhinestones.


The inside was kept relatively simple, and layered with White Daisies-bs. Stenciled some lace over it with Vintage Photo distress ink.


Supplies:
Tim Holtz- Layered Stencil: Lace
Tim Holtz - Distress Paint: Picket Fence
Maja Design - Cardstock: Coffee In The Arbour
- Lovely Weather
- Delicious Moments
- Grandma's Old Porcelain
- Raspberry Jam Cookies
- White Daisies

Prima Marketing- Finnabair Mechanicals - Mini Stars (Metal)
Flowers
Want 2 Scrap- Adhesive Rhinestones: Navy Blue
Vintage Photo Distress Ink

And, as promised, the randomly selected winner of the Lets Party 12x12 layout and card is...


Binte Yousuf, please email your postal address and contact number to sabascraftland@gmail.com, and I will have them mailed to you.
Happy Crafting!


Saturday, May 14, 2016

Lets Party!

Hello lovelies, its the second Saturday of the month, and I am delighted to share my projects for Artful Crafting Moodboard Challenge 13.


So I did two projects this time, a card and a 12"x12" layout. I tried, I really tried, to capture the entire process on camera, but my camera wasn't too happy about recording it all. [I am looking into buying another one now, and would love your feedback, recommendations, and suggestions.]


Lets begin with the moodboard and kit:


Our theme is "Layers" and as you can tell by the moodboard, its all happy, colorful, and festive.


I'll start with the card, as that was the first project I worked on. The below video shows you practically everything, except the part where I add UTEE to the frame, and smear it with stickles.


The red dots are liquid pearls, outlined with a gel pen. [All supplies listed in the end.] The inside of the card looks like this:


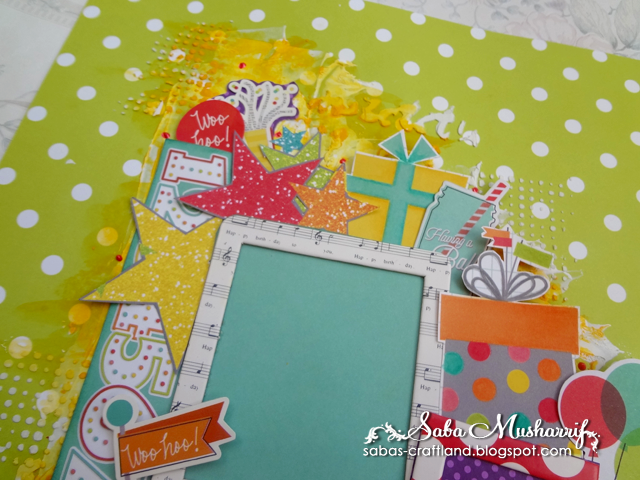
The second project is a 12x12, bright and colorful layout.


In the video below I have managed to capture how the texture was added.


The rest was pretty simple--just adding the layers.


Once the base was dry, I layered the polkadot frame just like I layered the star one, and stuck the round "Hooray" sticker from the sticker sheet, in the center of the frame.


These presents looked so cute! so I decided to stack them next to the frame. I fussy cut the yellow and dotted ones, and then added some highlights to each with color pencils. The below picture shows you the difference that made.


Can you see how it added some dimension, and just made it appear brighter.


Once done, I simply stacked them along the side, with some other elements like stars, flowers, and ribbon.


BTW: The frame has a opening on the top allowing you to slide in a picture.


And last but not the least, I intend to giveaway both the card, and layout. If you are interested please mention so in the comments; if there are more than one people interested, I'll pick randomly. Thanks

Supplies:
Distress crayon: Mustard Seed
Liquid Pearls: Ruby Red
Sticker Sheet: Simple Stories - Let's Party
Cardstock: 12"x12" Simple Stories - Let's Party
Cardstock: 8"x8" Artful Crafting - Dotted Essentials Cup Cake Assortment 
Cardstock: 6"x6" Simple Stories - Let's Party
Cardstock Die Cuts: Simple Stories - Let's Party 
Chipboard Frames: Simple Stories - Let's Party
Mulberry Roses: Artful CraftingTangarine [medium], Burgundy [small]
Glitter Glue: Ranger - Star Dust Stickles
Embossing Enamel: Ranger - UTEE Clear
Brads
Ribbon


Saturday, April 9, 2016

Mum Themed Layout


As we take a new approach to the challenges being hosted at Artful Crafting, I wanted to try out something very different for this challenge. Presenting to you, my very first 12"x12" layout, made specially for Artful Crafting Challenge 12: Mum.

What's new about the challenge you ask? well, at AC we decided that, April onwards, each challenge theme will be accompanied by a mood board, which will determine the "look and feel" of your project. You can read more about the challenge on the Artful Crafting blog; Adding the mood board for April below.


Lets start with the absolutely gorgeous kit I received. 

Isn't it so pretty! [I'm listing all the products at the bottom, under Supplies]

I started by applying a thin layer of white Gesso on a 12"x12" piece of corrugated heavy board (taken from an old carton). Gesso was watered down and applied sparingly, because I did not want a stark white background. Below image shows exactly how it looked when done.
Next, I distressed the edges of Soft Shell Swiss Dotted cardstock, tore it up on two sides, inked all the edges with Tattered Rose, and adhered it to the base.


While this dried, I began working on the embellishments. First up, was the beautifully dry embossed butterfly, around 4" in size.


I painted it with Chiffon Pink #29517, then went over the edges with some bright pink poster paint (purchased from a local store), then went over the entire piece with a wet brush, just to get color all over the butterfly. Then, I added some detail with the darker shade, and left it to dry. While it dried, I applied gesso to the chipboard teacups and kept them aside. Next, I heat embossed the butterfly using clear embossing powder, and began painting the diecut tea cups in the same fashion as the butterfly.

Inspired by the teacup in the mood board, I fussy cut a bunch of roses, from the 6"x6" Tales of You and Me cardstock, and adhered them to the teacups before heat embossing them.

At this point, I began arranging the elements to ensure I was on track. I tore up the patterned cardstock from the collection, to create the layers for the photograph, and to tuck some under the Soft Shell "V"s .
I then cut out the center of two doilies, painted one with Chiffon Pink #29517, and added patterned paper to both.

As the layout was now beginning to come together, I could visualize where the tag, and other diecuts would fit best. I decided to ink up the tag, and the top layer of Anjas Vintage Frame with Bundled Sage.
I cut the frame (both layers) in half.

After inking the tag, I stamped it with one of the Tales of You and Me Rubber Icons, and finished it with a cute little bow. Ah! all the elements were now ready to be adhered. (I wish I could have videoed the entire process, sigh)

 So basically this is how I layered the photograph, and then added all the elements accordingly.


Stamped "Mum" with Archival Black, and the rest with memento Bamboo Leaves, and Rose Bud.


Supplies used:

Cardstock
Bazzill Dotted Swiss Cardstock: Soft Shell
Prima Marketing Tales of You and Me 8" x 8" and 6"x6"

Die Cuts:
Anjas Vintage Frame from Marianne Design Creatables
Butterfly
Tag
Chipboard Tea Cups


Embellishments:
Coffee Break , Laser Cut Wood Icons from Prima Marketing (teapot and speech bubble)

Flowers
Trinket Pins by Maya Roads
4" Heart, paper doilies by Royal Lace

Stamp:
Mum, Clear Magic stamps by Woodware
Tales of You and Me Rubber Icons, by Prima Marketing Inc
Ink:
Tattered Rose, Tim Holtz Distress Inks by Ranger
Bundled Sage, Tim Holtz Distress Inks by Ranger
Black, Archival
Rose Bud, Memento
Bamboo Leaves, Memento

Other:
Chiffon Pink, Twinkling H2Os by Luminarte

Clear Embossing Powder by Ranger

Happy Crafting!
  

Wednesday, March 30, 2016

Precious Moments

With the last year of school coming to an end, it is time for this lovely group of friends to take on bigger challenges in life. Though they might not be in the same class room, or institute, or get to meet each other everyday, the Precious Moments spent together will always be cherished.

That was basically the idea behind this diary, which was meant to hold lots of love shared amongst these parting friends.


For this project, I mainly worked with the Tales of You and Me collection by Prima. Added texture using stencils and stamps, and shimmer with Twinkling H2Os.


Entering this into:
My Time to Craft, Challenge 318: Girlie
Through the Purple Haze, Challenge #98: Flowers


Related Posts Plugin for WordPress, Blogger...