Sharing today, an easy way to create simple backgrounds by using one stencil, and as many colors are you wish!
Our challenge theme for February is Love, so the stencil I've used is Staggered Hearts by MFT.
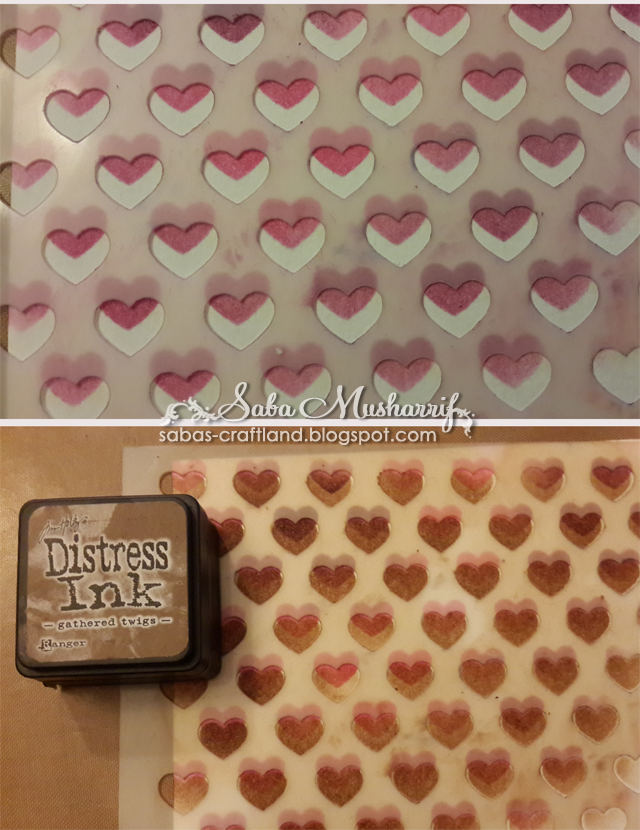
So, I started off by placing my stencil on water color paper, and inking the hearts with Picked Raspberry (my new hot favorite), and Seedless Preserves. Once done, I shifted the stencil down to create overlapping hearts in a darker color, as seen in the image below.
Gathered Twigs was the next color I chose.

Gathered twigs being the darkest color, comes through as the most dominating color, while Seedless Preserves and Picked Raspberry appear as shadows. Note: The heavier you ink the top layer, the more opaque the front layer appears. I loved how the background looked at this point, but wanted to add some more color, to fill the white spaces.
I bumped the stencil to the left, and added some Mustard Seed. It looked pretty complete at this stage.
I wanted to keep this card really simple, so stamped the sentiment (from MFT Love You More) on vellum, secured it to the background, and layered the finished piece on Kraft card.
Now to add some more interest to the hearts, I wet my paint brush, and randomly added some strokes to each heart, causing the distress ink to lighten, and adding more dimension. Close Up below
Lastly, I covered around five hearts with Glossy Accents, just to make them pop a bit.
and that's all folks!
Happy Crafting!
Our challenge theme for February is Love, so the stencil I've used is Staggered Hearts by MFT.
So, I started off by placing my stencil on water color paper, and inking the hearts with Picked Raspberry (my new hot favorite), and Seedless Preserves. Once done, I shifted the stencil down to create overlapping hearts in a darker color, as seen in the image below.
Gathered Twigs was the next color I chose.

Gathered twigs being the darkest color, comes through as the most dominating color, while Seedless Preserves and Picked Raspberry appear as shadows. Note: The heavier you ink the top layer, the more opaque the front layer appears. I loved how the background looked at this point, but wanted to add some more color, to fill the white spaces.
I bumped the stencil to the left, and added some Mustard Seed. It looked pretty complete at this stage.
I wanted to keep this card really simple, so stamped the sentiment (from MFT Love You More) on vellum, secured it to the background, and layered the finished piece on Kraft card.
Now to add some more interest to the hearts, I wet my paint brush, and randomly added some strokes to each heart, causing the distress ink to lighten, and adding more dimension. Close Up below
Lastly, I covered around five hearts with Glossy Accents, just to make them pop a bit.
and that's all folks!
Happy Crafting!


its a wonderful technique <3 it kinda gives a 3d look :) learning.. :D
ReplyDeleteWow. What a 3d effect in the background. My eyes couldnt rest on just one heart :D
ReplyDeleteLovely sentiment.
such a fun technique... and I love picked raspberry tooo :)
ReplyDeleteLovely project. I think I liking the pickled raspberry, nice color.
ReplyDeleteAm in love with this shadowic effect!! It takes card to whole new dimension...Love it...Simple and Striking card!
ReplyDelete