Showing posts with label flower. Show all posts

Wednesday, January 20, 2016

Scalloped Petal Flower

Can't believe that January is nearly over, and we have only 11 days of CraftyKickstart16 left! Today I am sharing a super easy tutorial on how you can make the above scalloped petal flower. It is easy to make, and is simple yet very unique.

You will need:
4 scalloped squares, (2 large, 1 medium, and 1 small)
Glue
Stamens
Ink

5 scalloped square
I die cut the scalloped squares seen above, in 3 different sizes. You basically need 2 large scalloped squares, 1 medium scalloped square, and 1 small scalloped square.

Inked Edges
Next you need to ink the edges using a color which is a shade darker than the cardstock. Ink all the edges, of all the 4 scalloped squares.

The Folds
Once the edges have been inked, take on scalloped square and fold it in half. Then take the folded piece, and fold it in half again, so basically you've creased the square in quarters. Repeat this with all the four scalloped squares.

It is now time to give the quarters a petal shape.

Angled cuts
Unfold the quarter to half, and snip off the folded edges as seen in the above picture.  
Note: Do not cut all the way to the center. You must leave an approximate 0.5" space in the center, this will keep all the 4 petals intact, else they will fall apart.

Cutting the other edges
Unfold and refold to shape the other two sides, in the same fashion. The above picture shows how it should look at this stage. Repeat these steps for all the other pieces.

The shaped petals
The scalloped squares, should look like petals now; something similar to the above picture. The petals are now ready to be shaped as shown in the video below.


Note: The largest two will be shaped from the wrong side, while the remaining 2 pieces will be shaped right side up.

 
This is how they look after being shaped


To form the flower, the layers of petals need to be stacked and glued together, as shown in the video above.
Once glued together, I added some stamens to the center, and the flower was ready! [I didn't add stamens to the black one, but this one seemed incomplete without them.]

The final look
The top view.
That's all folks!
Happy Crafting!


Wednesday, September 30, 2015

Tutorial: Acetate Flowers

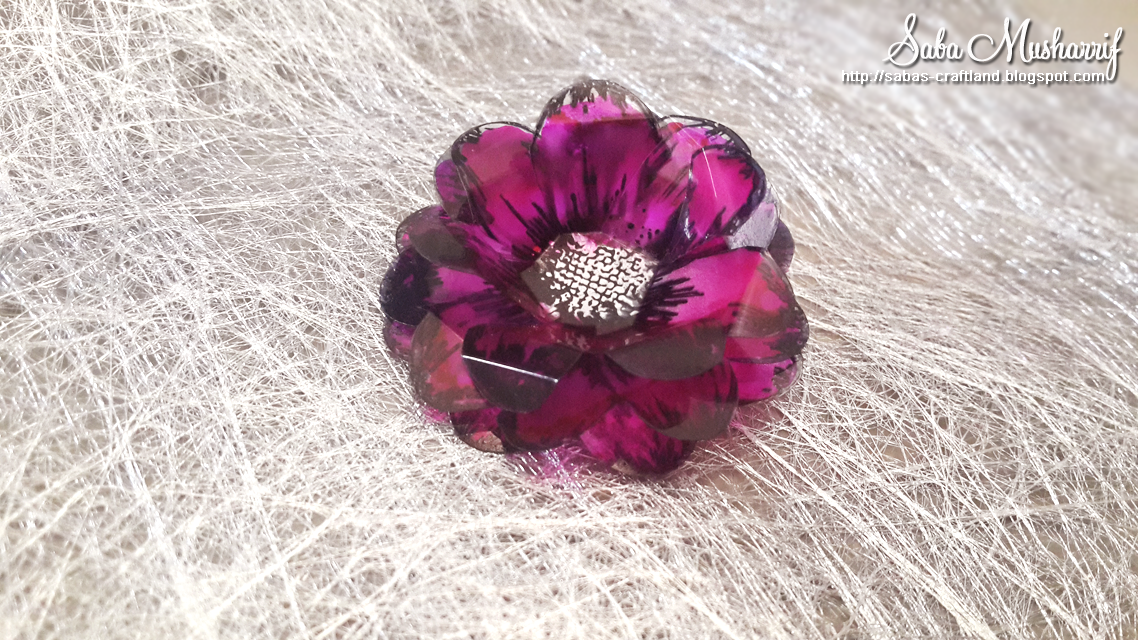
Hello hello! I thought of doing a bonus tutorial this month, and decided on making acetate flowers using alcohol inks. The above picture shows the finished piece. These are super easy to make and take about 10 minutes, max!

Lets get started, supplies required:
Alcohol Ink Blending Solution (optional)
Alcohol Ink: Raspberry (or any other color of your choice)
Alcohol Ink Mixative: Silver (or any other)
StazOn Ink: Black

Stamp: Bo Bunny Floral Stamp
Acetate Sheet
Paint brush
Plastic Palette or something similar


Scissors
Glue

Step 1: Ink up your stamp with StazOn, and carefully stamp out 3 images of the same flower, with the same stamp. (Use StazOn because it works with non-porous surfaces, unlike other inks.)
The stamped acetate

Step 2: Once dry, flip the stamped acetate, and color the reverse image with Raspberry. Be sure to color the petals ONLY. If you want a lighter shade, mix a few droplets of ink with blending solution, and color using a brush, that is what I did. Otherwise, apply the ink directly, and use the brush to control it.

The ink mixed with blending solution
Coloring the petals with a brush

Step 3: When the petals have dried, add a drop of mixative to the center, and spread it, with outward strokes. Remember, that you are coloring the reverse side of the stamped image, so don't panic if the mixative covers the stamped details.
Add a drop of mixative
Spread the mixative

Step 4: Using scissors, cut out the flowers by following the outline. Then, separate each petal by following its outline, without detaching it from the center. The cut out flowers should look something like the the picture below.
Place the flowers, stamped side up, so that all the details of the stamped image are visible. (This is one of the reasons why we color/ink the reverse side)
Cutout flowers with the stamped side up

*From this point forward we work on the flowers with the stamped side up.* 
 
Step 5: Now take one flower, and shape it, by gently bending the entire petal inwards (towards the center). When you bend it in, don't press the crease; you want the petal to stand up when you leave it. Once you've done that with all the petals of this flower, gently turn the tips of the petals outwards, without creasing them.
Bending the petal inwards
Bending the petal tips back

Step 6: Take the second flower, and shape it, by gently bending the tips of the petals outwards, and slightly bending the petal inwards. Unlike the first flower, you will only bend the petals in, half way, so that they aren't flat.
Bending the tips of the petal outwards
Step 7: The shaped layers should look something like this:
L-R: Layer one or top layer, Layer 2 or middle layer, Layer 3 or the base layer.
We will simply stack the layers now by sticking Layer 2 onto layer 3, and layer 1 onto layer 2. The flower has now taken shape.
The assembled flower
I took it a step further and turned it into a brooch, by sticking the gorgeous flower onto a brooch pin.
mounted on a brooch pin
You can now, use this lovely flower however you want.
The gorgeous brooch
Do give it a try, I would love to see your take on it.
Happy Crafting!
 

Sunday, April 27, 2014

Floral Profusion

As the name suggests, this post is all about flowers ;)


Second post of the day, dedicated to Floral Profusion challenge #114 (A Floral Profusion HANDMADE FLOWERS) being hosted by, Crafty Cardmakers And More.
This is a quick post, short and sweet! (I'm running short on time, the challenge is about to close, need to enter this)

Without further delay, I present my piece of art...
All these gorgeous red flowers are hand made using cardstock; not paper but cardstock. It was difficult to mold cardstock, and yes it made my fingers ache, but the results are amazing. The petals are a lot stronger, they don't tear or bend easily. 


These are keepsake boxes, ideal for gifting trinkets.
Hope these inspire you too!

Happy crafting!

Saturday, February 22, 2014

Come Fly With Me: Bird


I love working with birds and bird cages, and so I delightfully share with you my entry for Challenge #110 Come Fly With Me being hosted at Crafty Cardmakers and More.

Its a simple card in shades of white and lilac. The flowers are hand made; stamped and inked in dark and light tones of lilac. The bird and vine are chipboard, lightly inked, while the based is dry embossed. Sprinkled some white beads for finishing touches.

Happy Crafting!

Thursday, March 14, 2013

Craft March: Project 8 - "I Adore You"

Yup, I really do ;)

*Sigh* its been a very long, very busy and a very tiring week so far, alhumdolillah. I had completed this project on Sunday or Monday, but just didn't get a chance to post. So without further delay, I give you Project 8 - I Adore You!

The beauty of this card lies in the white roses. Each rose is hand made using the Tim Holtz die; the largest with 7 layers, medium with 6 and small with 3. The flourish in the background is white chipboard, and the cardstock is from Memory Box. I don't remember the exact name of the pa because two of Memory Box stacks got mixed somehow, and now I cant remember which is which. The little 'dew drops', I don't know what to call these. They aren't exactly rhinestones, but something on those lines. The dew drops were inspired by Erum Tasneem's cards - her recent collection has bursts of glitter balls, and bling and they look really nice. Added some trim to give the card 'the complete look.'


I wanted the roses to be pure white. I simply shaped the petals without using any ink or paint on them.


The tag is layered too.

thats all folks!

Happy Crafting


Friday, March 8, 2013

Craft March: Project 6 - Moments in Time

This project was inspired by the Craft Hop weekly challenge posted by Firefly. The requirements were super simple; Spring - incorporate a hand made flower.
I had received some new supplies from Many Happy Return, and I couldn't wait to try them out - this theme let me incorporate all my favorite supplies. so YAY!

  
This is a big card ladies! 6.25" x 6.25". All embellishments except the flowers are chipboard. Papers used are from My Mind's Eye and DCWV. All flowers are hand crafted!


The sentiment "Moments in time", because spring always gives us some awesome moments :)
Happy Crafting!


Wednesday, December 19, 2012

Roses!

 
So far December has been extremely inspirational with me wanting to constantly experiment with flowers. These roses were triggered by an order where the client wanted to embellish the favors with white flowers. I am self being extremely fond of white roses, was thus inspired to make some at 2 am last night (yes that is what happens when I get that creative urge :D )! for my ownself :)

I found this extremely wonderful freebie at Ellinee Journal which I used as the base of my project. I made some alterations to the template as I proceeded just to give the rose that 'look' that I found satisfactory. If my work inspires you to make some of your own, do share your creations with us!

The template has been posted by Lia as a PDF, so if you want to give it a try, hop on over there and give it a shot. These turn out absolutely gorgeous!  
*Please note that the template is for personal use ONLY*

Since I adore the end product I am sharing a few pictures with you all. I will be making more in red though; as soon as I have some time. But for now, enjoy!

Artistically placed at my work desk :D


And did I mention that these were really big! they are about 4" across and 2" high!

Beauties posing for a picture!

If you need any help on these, write in!

These are a must try so enjoy!
Happy Crafting!


Sunday, December 16, 2012

Furthering the Good Will

Early December a Give-Away was announced by Many Happy Returns at the launch of their blog, Artful crafting. I was amongst the, approximately, 40 craft enthusiasts who participated, but sadly did not win. As I stopped by to congratulate the winners, I saw the following post by Shereen:
I CAN'T bear to see you SAD. What can I do, I'm a softie. So All of you SAD people cheer up i'm going to send each of you 1, Many Happy Returns 6x6 paper pack...
Needless to say it made my day, and I am sure it brought a smile to the others too. So the stack I got was named "Little Sunshine"; basically themed for a baby boy in shades of blue, yellow and green. I loved the stack, and decided to incorporate it in my newest project "Hand Crafted Flowers" for Favors & More. (You can read up on this project here)

There was no way that was I going to incorporate these in my project and not further the good will. So upon completion of the first set, I announced a quick quiz; whoever guessed the stack using which these blossoms were made, gets a set as a gift from us. With the first correct answer posted, by Sundus Mariya within 15 mins of the announcement, the quiz was over soon. Short and sweet!

Here is how I used the stack:


If you are interesting in purchasing these; email favorsmore@gmail.com;

These are designed especially for paper crafting projects such as scrapbooks, cards etc:
Size: 1" and 1.75"
Price: PKR 250 for a set of 6.

To view other products visit Favors & More
Thanks!
Happy Crafting!

 
Related Posts Plugin for WordPress, Blogger...