Showing posts with label Artful Crafting. Show all posts

Monday, November 6, 2017

Color Wash Collection By Artful Crafting


Artful Crafting recently introduced the extremely vibrant, and versatile Color Wash Collection, and I am super excited to share it with you.

The collection includes an A4 paper pack, of 20 sheets with 8 different designs. A pack of Pillow boxes, cards and tags.

The best thing about this collection is that, it caters to everyone; If you are a novice, looking to gift some trinkets, then you can simply order a pack of the pillow boxes, and you are good to go.

The gorgeous precut cards, save tons of time, and you can just start decorating them if you like, or just add your greetings and send it to your loved ones.

You can view the complete collection and designs in the video below.


I will be sharing another video soon, to show you how I used this collection for some fun projects.
Till then, you can hop over to Artful Crafting to place an order.

Have a great day, and Happy Crafting!


Saturday, June 11, 2016

Care For Some Coffee?


Before I begin talking about my project, I would like to wish all of you a blessed Ramadan! May we reap the benefits of this sacred month.


I made this, approximately 6"x6" card using goodies from Arftul Crafting's June Kit.


The theme for Challenge 14 is Rustic, and below is the gorgeous moodboard. You can read more about the challenge, and how you can participate by visiting the Artful Crafting Blog.


My kit included cardstock from the "Coffee In The Arbour" collection, which is designed by one of my favorite companies, Maja Design. I started off with  Lovely Weather and trimmed it 0.25" smaller than the card base. Next, I stenciled Lace using Picket Fence Distress Paint, and set it aside to dry.

 *Please be sure to wash your stencil as soon as you are done; its a task getting the paint off once it dries [speaking from experience]*


Doing so added some texture to the base, and toned it down a bit too. I then diecut two doilies, one from Grandma's Old Porcelain, the other from Raspberry Jam Cookies, and centered them onto the stenciled base. For the pleats, I cut out a 5.5" x 6" piece from Delicious Moments-bs, and creased it by hand. When done, I adhered the pleats to the base and dabbed them lightly with Picket Fence paint, to make them more prominent.
Next, I fussy cut the beautiful coffee spread printed on Delicious Moments, and adhered it to the center along with the tag. Last, but not the least, added some flowers, mini stars, ribbon, and rhinestones.


The inside was kept relatively simple, and layered with White Daisies-bs. Stenciled some lace over it with Vintage Photo distress ink.


Supplies:
Tim Holtz- Layered Stencil: Lace
Tim Holtz - Distress Paint: Picket Fence
Maja Design - Cardstock: Coffee In The Arbour
- Lovely Weather
- Delicious Moments
- Grandma's Old Porcelain
- Raspberry Jam Cookies
- White Daisies

Prima Marketing- Finnabair Mechanicals - Mini Stars (Metal)
Flowers
Want 2 Scrap- Adhesive Rhinestones: Navy Blue
Vintage Photo Distress Ink

And, as promised, the randomly selected winner of the Lets Party 12x12 layout and card is...


Binte Yousuf, please email your postal address and contact number to sabascraftland@gmail.com, and I will have them mailed to you.
Happy Crafting!


Saturday, March 12, 2016

Foil and Flowers

Its spring! Let the flowers blooms <3

The theme for Artful Crafting Challenge 11 is Flowers, and so my project has lots of flowers on it.
I begin with my super fabulous Kit (and speaking of Kit, AC has started its Kit Club and the Spring Kit is up for grabs)


I was so excited to see the Thermoweb Rainbow Deco Foil, and the Thermoweb Deco Foil Adhesive in my Kit! These are so easy to work with and the results are simply amazing.

For the background I stenciled the Thermoweb Deco Foil Adhesive onto an off white base. Now before you start using the adhesive, please unscrew the top and remove the seal.


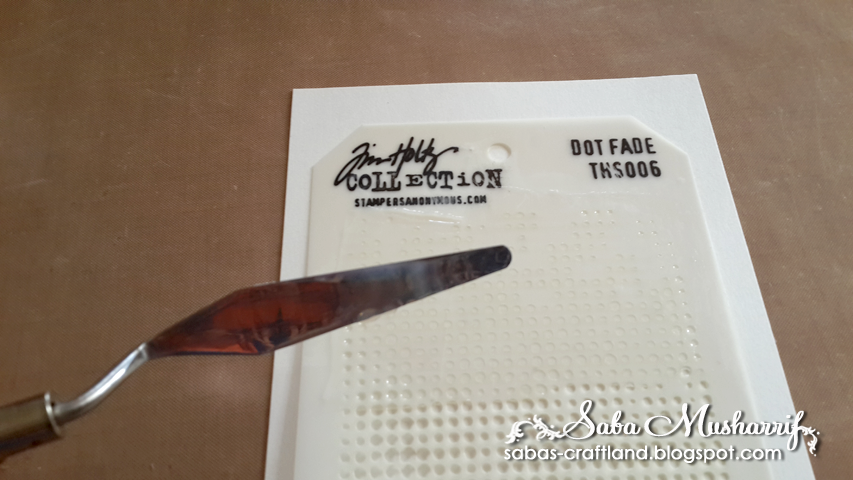
I layered the Tim Holtz Dot fade stencil onto the cardstock, and applied the adhesive over it with a painters knife.

I spread the adhesive evenly over all the required area. Once done I removed the stencil carefully, and soaked it in water immediately. To ensure that the stencil does not get spoilt, wash it immediately.

Once done, the adhesive needs to dry. As per the instructions, it dries in an hour, but in my case it dried in 10 minutes. I believe the weather, and thickness of the adhesive layer, impacts the drying time.

It is worthy to note here, that unlike other adhesives, the Thermoweb Deco Foil Adhesive stays sticky after it dries, and it is the stickiness that adheres the foil to the design. Each tube of Thermoweb Rainbow Deco Foil contains 5 sheets, and these are pretty thin sheets, so to be safe, when you take one out check ensure its just one and not two.


Next, I covered the adhesive base with foil, as seen above. When adhering the foil, please be sure that the bright shiny side is facing you. Then, gently rub over the foil to ensure it adheres well. I would not advice anyone to use a ruler, or a scoring at this stage, and avoid pressing down too hard on the foil, as it would make the adhesive spread and spoil the design.

Once satisfied, I gently peeled off the foil. Now, if you feel that some areas haven't foiled properly, just rub the foil over it again. As long as the adhesive is sticky, the foil with cover whatever area is left.

I was happy with how it turned out! its so simple and easy.

Now for the Gerbera Daisy, I used the spellbinders die which too was part of my kit.

Using the die, I cut out 16 petals each, 4 large and 2 small petal bases, and 2 centers. These dies make the task of flower making super simple. Just take each petal and push it through each slit, the large and medium petals go in the large base, while the small ones go into the small base. You can add glue to the tab on the bases, and stick the petals down as you push the petals in.

This is what they should look like. By the way, I cut the petals out of MME Look At This, and the petal bases and centers from  American Crafts Banana, textured cardstock.

Next, I shaped the petals lightly, which isn't necessary but I like shaping them. I simply flipped the layer over and shaped the petals with inward strokes. Did the same for the centers to curl them up. Next, I just stacked the layers one on top of the other and glued them down.


Last but not the least, I selected 2 purple Lillies, 1 pink Lilly,  2 pink rosebuds, and 3 leaves from the bunch of amazingly beautiful mulberry flowers, and arranged them over a decorative frame cut out of MME This Moment, which I adhered to the foiled base. Next I added a sentiment to finish it off.

A couple of close ups below:
 

Supplies Used:
Thermoweb Rainbow Deco Foil
Thermoweb Deco Foil Adhesive
Spellbinders Gerbera Daisy
MME Look At This
MME This Moment
American Crafts Banana
Purple Lillies
Pink Lilly
Pink rosebuds

Hope you enjoyed reading this post, looking forward to your entries to Challenge 11

Happy Crafting!
 

Saturday, December 12, 2015

Altered Stars

Hello beautiful people!
Hoping all of you are keeping well, and enjoying the amazing weather! Karachi rarely experiences "winters", so I am delightedly that we are finally getting our share of the cold winds. Enough about the weather, now about crafts.

Today Artful Crafting's Challenge 9 goes live, and our theme is "Altering". Me thinks, this is one of our best themes so far, simply because we all have something or the other stored away, with the intention of altering at some point in time. Well lovelies, this is your chance to get started on all those boxes, bottles, mason jars, and what not, that you have been holding on to since forever.

I altered two star shaped, Darice paper mache, boxes which were part of my kit.
My December Kit from Artful Crafting
Before I move on to my project, I have to say that this Kraftastic Glittered Cardstock (By Ruby Rock It) is absolutely gorgeous, and unfortunately the pictures fail to capture their beauty. If you like glitter, these are a must have; highly recommended by me.

The Altered Boxes
I started by first collecting some coordinating cardstock, which I could use to highlight the Kraftastic cardstock. Highlighting was required, to keep the box and cardstock from blending in completely (This was my personal preference, you don't need to do it).

White was used with the Pink Starry Night and dark blue with the Blue Polka Dot. For the side I cut out a 1.75" wide strip of plain cardstock, and another strip of the Glittered cardstock. The glittered strip was about 1/8th inch narrower than the plain cardstock one. After inking both the strips, I adhered the base strip followed by the glittered cardstock.
A picture of the adhered base cardstock
For the top, I just traced the lid out on the glittered Pink Polka Dot, and cut it out by hand. For the blue one, I traced it out on plain dark blue cardstock, and cut it out by hand. It was then adhered, and embellished.

Close Up of the pink box
For the pink box, I painted the square Prima Antique Resin frame, with "hot pink" acrylic paint and left it to dry. Once dry, the details were highlighted with Platinum stickles. Next I fussy cut some stars from the cardstock and adhered a few in the center of the polka dot, and some to the back of the frame. The frame was then mounted onto chipboard, and carefully secured, such that it stays at an angle. The frame was then surrounded with Fluffy roses, and glitter balls. The large stars were outlined with Start Dust, while Hot Pink self adhesive bling, from Want 2 Scrap, was added to the lid, along with Bronze Micro Beads, by Prima. I came up with the sentiment myself.

Close Up of the blue box
For the blue box, I cut out straight banners from White Starry Night, and Blue Polka Dots. White Starry Night ones were outlined with Ocean Blue liquid pearls, while the Blue Polka Dot ones were outlined with Star Dust stickles. I kept the original color of the rectangular Prima Antique Resin frame, and highlighted the details with Ocean Blue liquid pearls. I took some liquid pearls on the tip of my finger and rubbed them over the details. Added flowers to the base of the frame, and some Turquoise self adhesive bling to the empty areas of the box.

Close up of the sides of the lids.
I finished off the boxes by decorating the sides of the pink box with 0.5" strip of white card, which I covered with Clear Rock Candy Distress Crackle Paint, after pasting it on. Once it was dry I went over it with Vintage Photo Distress ink and added horizontal lines, using Platinum stickles. For the blue box, I just added horizontal lines using Ocean Blue liquid pearls and Start Dust, to the original base.

Supplies Used:

Darice paper mache

White Starry Night
Pink Starry Night
Blue Polka Dots
Pink Polka Dot 


Start Dust Stickles
Platinum stickles


Turquoise self adhesive bling
Hot Pink self adhesive bling


Bronze Micro Beads

Prima Antique Resin frame

Clear Rock Candy Distress Crackle Paint
Vintage Photo Distress ink


That's all Folks!
(Oh! and just to let you know, the challenge is open world wide. If you want to play, just hop over to Challenge 9)

Happy Crafting.

Thursday, September 24, 2015

Scrapbook (Memory Book): Princess

Fairy tale Princess was one of my recently completed projects; an 8" x 8" scrapbook / memory book made for a baby girl. The requirement was to keep the pages open, as in, not restrict them with specific events, thereby allowing the parents to document moments as they deem fit.

So there are a lot of photomats in there, and lots of room to document.

This a photo wallet, with a cute belly belt.

I love the little details that are part of the Simple Stories: Enchanted collection.

Its not easy being a Princess!

This is such a lovely page, and its a shame that I was unable to capture its beauty, even though I tried several times! The heart is actually silver foil, and the pocket holds a removable tag.

Love the Toad! Micro beads used as centers for the flowers

One of my favorite pages from this book. I love threading the scalloped circles!!


These two pages, were designed with a radio theme -- which was a special request.

Wish, dream and believe!

Shine: Leave a little sparkle where ever you go!

and finally the box:

Since yellow and purple were to be the main colors, I had to use elements and papers from different collections to make this scrapbook / memory book.
The main collections / cardstock used are:
Enchanted - Simple Stories
Dotted Essentials - Artful Crafting

Beauty Seven - Authentique

Happy Crafting!
~Saba


Wednesday, August 19, 2015

Scrapbook (Memory Book) : Boy Oh Boy!


The Box for the Scrapbook / Memory book
Sharing an extremely colorful, yet boyish memory book / scrapbook I made for a soon to arrive baby boy.
This is an 8" x 8" memory book / scrapbook, which fits comfortably in its, custom designed, 10" x 10" hard box.
A close up of the box; the frame can hold the baby's picture

A close up of the cover, which was made with multiple layers.


Cloud style pockets Flipping photomats


Stitched buttons Sweet boy plaque with a "fun" bottle cap


These beautiful pockets were made using diecuts gifted by Artful Crafting-- they were layered and secured

Documenting milestones as the baby grows Dotted buttons hold down the pockets


The keepsakes

Large pockets with lots of space for more Window pockets to keep the precious memories safe


All wishes here More moments documented here

Paper Collections:
SCOOT - Echo Park
Dotted Essentials - Artful Crafting


Related Posts Plugin for WordPress, Blogger...