Showing posts with label Altered. Show all posts

Sunday, March 18, 2018

Altered Alphabets: Kids room decoration


Today I am blogging about the wooden alphabets that I recently altered, for my little nephew. I have captured the process on video, and you can watch it below.


Here is a close up of the glittery stars,


List of items used :
- Delta Ceramcoat Acrylic Paint:
Caribbean Blue
Blue Bayou 

- Stencils:
Tim Holtz - Dot Fade
Stars

- Distress Ink:
Pumice Stone

- Texture Paste

- Glitter Glue

- Paint Brush

- Sponge

Happy Crafting!!

Tuesday, August 8, 2017

Alter / Upcycle Wooden Frame : Inspire

Altered mixed media , Trellis layered stencil , Timholtz
A wooden picture frame had been lying around, all lonely and sad for the past few years. I finally decided to give it a new life, by applying some mixed media techniques to alter / upcycle it.

I used gesso, texture paste, some charms, chipboard diecuts, and lots of ink. Yup, I did capture the process on camera. Embedding the youtube video below:


 And here a close up of the quilled "Inspire".

Quilled Inspire

 Happy Crafting!

Tuesday, March 7, 2017

Altered: Beautiful Tins

All of us have used lots of moisturizes this winter, and surely there are some empty tins, and bottles lying around waiting to meet the bin. I wanted to use the empty Nivea Creme tins to store some teeny tiny craft elements and so I decided to give them a new look.

I started off by washing the tins thoroughly, leaving them squeaky clean and ready for the makeover. Once dry, I spray painted them Coca Brown and let the paint dry.

TIP: Spray paint the base and lid separately, this will ensure complete coverage. Do not touch the box until it is completely dry; If you do, the paint will just wipe off.

Next I chose some of my favorite stencils, and placed them on the box, in a manner that the design would cover the raised text.
Stampers Anonymous Stencil Floral 2017 release
I am using the Floral stencil from Tim Holtz's layering stencils collection - 2017. Once happy with the position, I stenciled modeling paste onto the box.

Since this is tin, and the base isn't flat, the stencil slips when applying the paste. You can tape it down if you like, but I just held it down with my hand as I wasn't looking for a perfect print.

While the paste was drying, I activated Bashful Blue, Chiffon Pink and Sea Glass Twinkling H2O's for coloring the stenciled design.


Colored parts of the design, and left it to dry.

I altered three tins, using three different designs, and each looks beautiful.


You can layer the inside of the base with felt -- if you like.

Linking it to Altered Eclectics monthly challenge. 

Happy Crafting!
 

Sunday, February 26, 2017

Project Babushka

I take delight in experimenting, working with new mediums, and trying out new things (and by new things I mean, things that I have not worked with before). It is for this reason that I am blessed with the opportunity of working on a whole bunch of unusual projects, alhumdolillah. Today, I will be sharing one such project, Project Babushka!


This project rolled out sometime in September 2016, and as much as I wanted to make this part of my "year in review" post, I couldn't -- because I never got around to writing one, ha!

So the requirement was basically to customise babushka dolls, as giveaways for a surprise party being hosted in Russia. Sounds pretty simple, -- but its not that simple.

The first step was to find the plain dolls; my first preference was to get them from somewhere within the city/country. But that didn't work out, so they had to be imported. When I opened the carton, I realized that I had to do a lot more than I had expected.

Step 2 involved sanding each and every doll individually. This was THE most time consuming, yet integral, step of the project as this was the only way to make the top fit the base, perfectly.


Next up was the process of customization. I was provided high resolution pictures, which I had to edit, -- adding / removing people, superimposition the bodies etc. This was fun, and I was impressed with my Photoshop skills! lol.  Each nested doll was meant to have 1 custom picture, except for the largest and smallest, which had 2 pictures each.

*the faces have been blurred for privacy- incase you were wondering*

With the images ready and printed it was time to layer them onto the dolls - decoupage basically.
This was a bit tricky because of the babushka doll's shape, and also because these were nested, so the image had to split in two, such that the joint isn't very visible.
The last step was to seal them with varnish.


And that was project Babushka, handmade in Pakistan!


Tuesday, October 18, 2016

A Shelf for the Ink Pads - DIY


If you have been paper crafting for sometime now, I am sure you have a sizable collection of inks, half of which you've forgotten about, because they aren't 'visible' all the time. Due to limited space, and sheer lack of organization, I had similar issues and so, I decided to make a shelf for these colorful little things.

I started off with this very sturdy gift box, which I had received from Pepsi as part of their Lighting Up Lives Campaign (its a great campaign). I choose to work with this one because the lid and the base have the same depth, making it easier to stack them on their sides. 

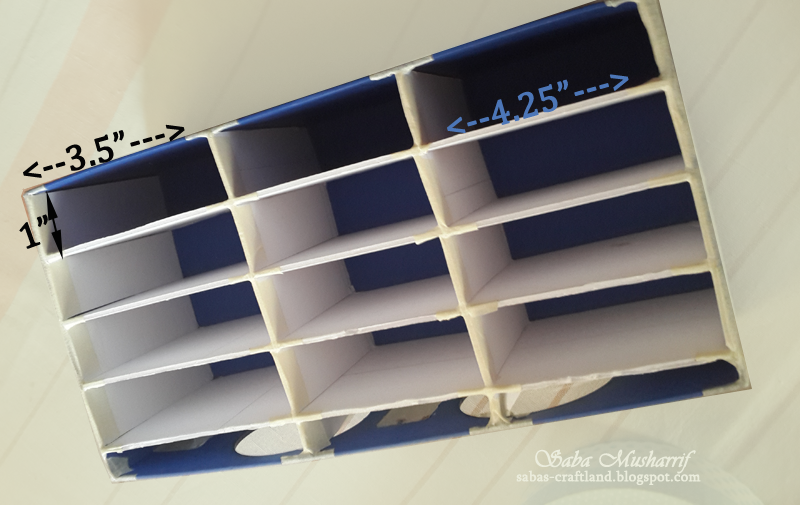
So step one was to basically remove the lid from the base, and add horizontal layers to form the shelves. For the layers I've used light board (left over from a previous project,) which has a thickness of 1/8". Since the Inks pads are not heavy, this board served the purpose well.
Incase you are wondering about the measurements, at this stage, I simply placed the box over the board and traced out the required size. The spacing between each shelf, however was approximately 1".

Step two was securing the shelves, in place and adding vertical dividers. I cut out comb style dividers, as I felt they would not only be very sturdy but also super easy to adhere. (You will need to add 0.5 inches slits in the shelves too, this will allow the divider and shelf to lock together)
Once cut, I simply pushed these into the existing layers and secured it all together, keeping a distance of 3.5" and 4.25" as shown below. 3.5" is good for distress ink pads, 4.25" works for staz on, archival etc.

I repeated the same steps for the lid, and then secured it on top of the base. This gave me shelving space to 24 ink pads <3.


Next I simply painted the base, stamped over it, and added chipboard Alphas. Once dry, it was home to some of the ink pads and their accessories!

I am, alhumdolillah, so happy with this. It has made life so much easier. It took me around 5 hours to make it, super easy and so useful. If you don't want to buy one, then try making one for yourself too.
Take care, and happy crafting


Saturday, December 12, 2015

Altered Stars

Hello beautiful people!
Hoping all of you are keeping well, and enjoying the amazing weather! Karachi rarely experiences "winters", so I am delightedly that we are finally getting our share of the cold winds. Enough about the weather, now about crafts.

Today Artful Crafting's Challenge 9 goes live, and our theme is "Altering". Me thinks, this is one of our best themes so far, simply because we all have something or the other stored away, with the intention of altering at some point in time. Well lovelies, this is your chance to get started on all those boxes, bottles, mason jars, and what not, that you have been holding on to since forever.

I altered two star shaped, Darice paper mache, boxes which were part of my kit.
My December Kit from Artful Crafting
Before I move on to my project, I have to say that this Kraftastic Glittered Cardstock (By Ruby Rock It) is absolutely gorgeous, and unfortunately the pictures fail to capture their beauty. If you like glitter, these are a must have; highly recommended by me.

The Altered Boxes
I started by first collecting some coordinating cardstock, which I could use to highlight the Kraftastic cardstock. Highlighting was required, to keep the box and cardstock from blending in completely (This was my personal preference, you don't need to do it).

White was used with the Pink Starry Night and dark blue with the Blue Polka Dot. For the side I cut out a 1.75" wide strip of plain cardstock, and another strip of the Glittered cardstock. The glittered strip was about 1/8th inch narrower than the plain cardstock one. After inking both the strips, I adhered the base strip followed by the glittered cardstock.
A picture of the adhered base cardstock
For the top, I just traced the lid out on the glittered Pink Polka Dot, and cut it out by hand. For the blue one, I traced it out on plain dark blue cardstock, and cut it out by hand. It was then adhered, and embellished.

Close Up of the pink box
For the pink box, I painted the square Prima Antique Resin frame, with "hot pink" acrylic paint and left it to dry. Once dry, the details were highlighted with Platinum stickles. Next I fussy cut some stars from the cardstock and adhered a few in the center of the polka dot, and some to the back of the frame. The frame was then mounted onto chipboard, and carefully secured, such that it stays at an angle. The frame was then surrounded with Fluffy roses, and glitter balls. The large stars were outlined with Start Dust, while Hot Pink self adhesive bling, from Want 2 Scrap, was added to the lid, along with Bronze Micro Beads, by Prima. I came up with the sentiment myself.

Close Up of the blue box
For the blue box, I cut out straight banners from White Starry Night, and Blue Polka Dots. White Starry Night ones were outlined with Ocean Blue liquid pearls, while the Blue Polka Dot ones were outlined with Star Dust stickles. I kept the original color of the rectangular Prima Antique Resin frame, and highlighted the details with Ocean Blue liquid pearls. I took some liquid pearls on the tip of my finger and rubbed them over the details. Added flowers to the base of the frame, and some Turquoise self adhesive bling to the empty areas of the box.

Close up of the sides of the lids.
I finished off the boxes by decorating the sides of the pink box with 0.5" strip of white card, which I covered with Clear Rock Candy Distress Crackle Paint, after pasting it on. Once it was dry I went over it with Vintage Photo Distress ink and added horizontal lines, using Platinum stickles. For the blue box, I just added horizontal lines using Ocean Blue liquid pearls and Start Dust, to the original base.

Supplies Used:

Darice paper mache

White Starry Night
Pink Starry Night
Blue Polka Dots
Pink Polka Dot 


Start Dust Stickles
Platinum stickles


Turquoise self adhesive bling
Hot Pink self adhesive bling


Bronze Micro Beads

Prima Antique Resin frame

Clear Rock Candy Distress Crackle Paint
Vintage Photo Distress ink


That's all Folks!
(Oh! and just to let you know, the challenge is open world wide. If you want to play, just hop over to Challenge 9)

Happy Crafting.

Saturday, April 11, 2015

ACDT Post: Up in the clouds

Hello!

Today I am sharing my DT project for Artful Crafting's Challenge #1: Stenciling.


Here is the awesome kit used for the challenge, provided by Artful Crafting.

For the top, I used the Distress Speciality Stamping paper as the base and sprayed it with the Teal Bloom Spray which gave it a beautiful shimmer, and smoky kind of effect.

I then used the Delphinium stencil to create textured "clouds", and highlighted them with black.

The shaded heart was covered with a heavy coat of Distress Crackle paint, and layered onto stamped specialty paper. The crackle paint gave the heart an absolutely gorgeous effect, I just love it!

DARICE-Paper Ma
DARICE-Paper Mach
 I decorated the sides and tada! my project was complete

DARIC
 You can find the supplies here:
Memory Box Stencil Delphinium

DARICE - Paper Mache Oval Box

Ranger Distress Specialty Stamping Paper

Prima Marketing Bloom Spray-Soft Tea

Ranger Crackle Paint Rock Candy

Archival Jet Black

Martha Stewart - Scalloped edge punch

Ranger Distress Ink Evergreen Bough

Color Box- Fluid Chalk- Rose Petals
Related Posts Plugin for WordPress, Blogger...