Saturday, May 14, 2016

Lets Party!

Hello lovelies, its the second Saturday of the month, and I am delighted to share my projects for Artful Crafting Moodboard Challenge 13.


So I did two projects this time, a card and a 12"x12" layout. I tried, I really tried, to capture the entire process on camera, but my camera wasn't too happy about recording it all. [I am looking into buying another one now, and would love your feedback, recommendations, and suggestions.]


Lets begin with the moodboard and kit:


Our theme is "Layers" and as you can tell by the moodboard, its all happy, colorful, and festive.


I'll start with the card, as that was the first project I worked on. The below video shows you practically everything, except the part where I add UTEE to the frame, and smear it with stickles.


The red dots are liquid pearls, outlined with a gel pen. [All supplies listed in the end.] The inside of the card looks like this:


The second project is a 12x12, bright and colorful layout.


In the video below I have managed to capture how the texture was added.


The rest was pretty simple--just adding the layers.


Once the base was dry, I layered the polkadot frame just like I layered the star one, and stuck the round "Hooray" sticker from the sticker sheet, in the center of the frame.


These presents looked so cute! so I decided to stack them next to the frame. I fussy cut the yellow and dotted ones, and then added some highlights to each with color pencils. The below picture shows you the difference that made.


Can you see how it added some dimension, and just made it appear brighter.


Once done, I simply stacked them along the side, with some other elements like stars, flowers, and ribbon.
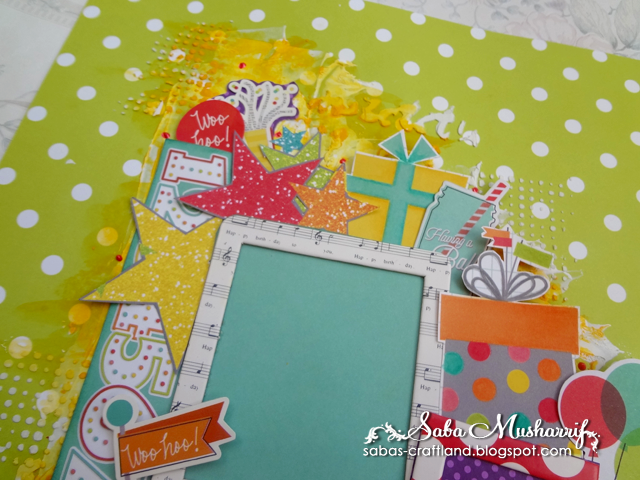


BTW: The frame has a opening on the top allowing you to slide in a picture.


And last but not the least, I intend to giveaway both the card, and layout. If you are interested please mention so in the comments; if there are more than one people interested, I'll pick randomly. Thanks

Supplies:
Distress crayon: Mustard Seed
Liquid Pearls: Ruby Red
Sticker Sheet: Simple Stories - Let's Party
Cardstock: 12"x12" Simple Stories - Let's Party
Cardstock: 8"x8" Artful Crafting - Dotted Essentials Cup Cake Assortment 
Cardstock: 6"x6" Simple Stories - Let's Party
Cardstock Die Cuts: Simple Stories - Let's Party 
Chipboard Frames: Simple Stories - Let's Party
Mulberry Roses: Artful CraftingTangarine [medium], Burgundy [small]
Glitter Glue: Ranger - Star Dust Stickles
Embossing Enamel: Ranger - UTEE Clear
Brads
Ribbon


Saturday, April 9, 2016

Mum Themed Layout


As we take a new approach to the challenges being hosted at Artful Crafting, I wanted to try out something very different for this challenge. Presenting to you, my very first 12"x12" layout, made specially for Artful Crafting Challenge 12: Mum.

What's new about the challenge you ask? well, at AC we decided that, April onwards, each challenge theme will be accompanied by a mood board, which will determine the "look and feel" of your project. You can read more about the challenge on the Artful Crafting blog; Adding the mood board for April below.


Lets start with the absolutely gorgeous kit I received. 

Isn't it so pretty! [I'm listing all the products at the bottom, under Supplies]

I started by applying a thin layer of white Gesso on a 12"x12" piece of corrugated heavy board (taken from an old carton). Gesso was watered down and applied sparingly, because I did not want a stark white background. Below image shows exactly how it looked when done.
Next, I distressed the edges of Soft Shell Swiss Dotted cardstock, tore it up on two sides, inked all the edges with Tattered Rose, and adhered it to the base.


While this dried, I began working on the embellishments. First up, was the beautifully dry embossed butterfly, around 4" in size.


I painted it with Chiffon Pink #29517, then went over the edges with some bright pink poster paint (purchased from a local store), then went over the entire piece with a wet brush, just to get color all over the butterfly. Then, I added some detail with the darker shade, and left it to dry. While it dried, I applied gesso to the chipboard teacups and kept them aside. Next, I heat embossed the butterfly using clear embossing powder, and began painting the diecut tea cups in the same fashion as the butterfly.

Inspired by the teacup in the mood board, I fussy cut a bunch of roses, from the 6"x6" Tales of You and Me cardstock, and adhered them to the teacups before heat embossing them.

At this point, I began arranging the elements to ensure I was on track. I tore up the patterned cardstock from the collection, to create the layers for the photograph, and to tuck some under the Soft Shell "V"s .
I then cut out the center of two doilies, painted one with Chiffon Pink #29517, and added patterned paper to both.

As the layout was now beginning to come together, I could visualize where the tag, and other diecuts would fit best. I decided to ink up the tag, and the top layer of Anjas Vintage Frame with Bundled Sage.
I cut the frame (both layers) in half.

After inking the tag, I stamped it with one of the Tales of You and Me Rubber Icons, and finished it with a cute little bow. Ah! all the elements were now ready to be adhered. (I wish I could have videoed the entire process, sigh)

 So basically this is how I layered the photograph, and then added all the elements accordingly.


Stamped "Mum" with Archival Black, and the rest with memento Bamboo Leaves, and Rose Bud.


Supplies used:

Cardstock
Bazzill Dotted Swiss Cardstock: Soft Shell
Prima Marketing Tales of You and Me 8" x 8" and 6"x6"

Die Cuts:
Anjas Vintage Frame from Marianne Design Creatables
Butterfly
Tag
Chipboard Tea Cups


Embellishments:
Coffee Break , Laser Cut Wood Icons from Prima Marketing (teapot and speech bubble)

Flowers
Trinket Pins by Maya Roads
4" Heart, paper doilies by Royal Lace

Stamp:
Mum, Clear Magic stamps by Woodware
Tales of You and Me Rubber Icons, by Prima Marketing Inc
Ink:
Tattered Rose, Tim Holtz Distress Inks by Ranger
Bundled Sage, Tim Holtz Distress Inks by Ranger
Black, Archival
Rose Bud, Memento
Bamboo Leaves, Memento

Other:
Chiffon Pink, Twinkling H2Os by Luminarte

Clear Embossing Powder by Ranger

Happy Crafting!
  

Wednesday, March 30, 2016

Precious Moments

With the last year of school coming to an end, it is time for this lovely group of friends to take on bigger challenges in life. Though they might not be in the same class room, or institute, or get to meet each other everyday, the Precious Moments spent together will always be cherished.

That was basically the idea behind this diary, which was meant to hold lots of love shared amongst these parting friends.


For this project, I mainly worked with the Tales of You and Me collection by Prima. Added texture using stencils and stamps, and shimmer with Twinkling H2Os.


Entering this into:
My Time to Craft, Challenge 318: Girlie
Through the Purple Haze, Challenge #98: Flowers


Scrapbook: Frozen

A couple of months back, I had the pleasure of making a Frozen themed scrapbook for little Zaynab. For the cover I decided to add a picture of all the characters, with a snow topped plaque, that reads Zaynab.


Tried to capture the slight shimmer added to the snow, but failed miserably. (PS: the "snow" might look soft and foamy, but it actually is pretty hard and long lasting. Happy with my recipe)

Below I am sharing some of my favorite pages:


Keeping her age in mind, I added a little photo wallet, accordion style photo mats, and tit-bits which I felt she would enjoy.


 Keeping in theme with frozen, and snow, I covered the edges of the box with snow too.

Chipboard picture frame added to the box, so Zaynab can add in here picture there too.
She loved the album, and so did all her friends at school. 
Her aunt shared a picture of the name banner I had made for her when she was tiny, hehe, she still has it up in her room. <3

I love the colorful seabed too!
Happy Crafting!!

Saturday, March 12, 2016

Foil and Flowers

Its spring! Let the flowers blooms <3

The theme for Artful Crafting Challenge 11 is Flowers, and so my project has lots of flowers on it.
I begin with my super fabulous Kit (and speaking of Kit, AC has started its Kit Club and the Spring Kit is up for grabs)


I was so excited to see the Thermoweb Rainbow Deco Foil, and the Thermoweb Deco Foil Adhesive in my Kit! These are so easy to work with and the results are simply amazing.

For the background I stenciled the Thermoweb Deco Foil Adhesive onto an off white base. Now before you start using the adhesive, please unscrew the top and remove the seal.


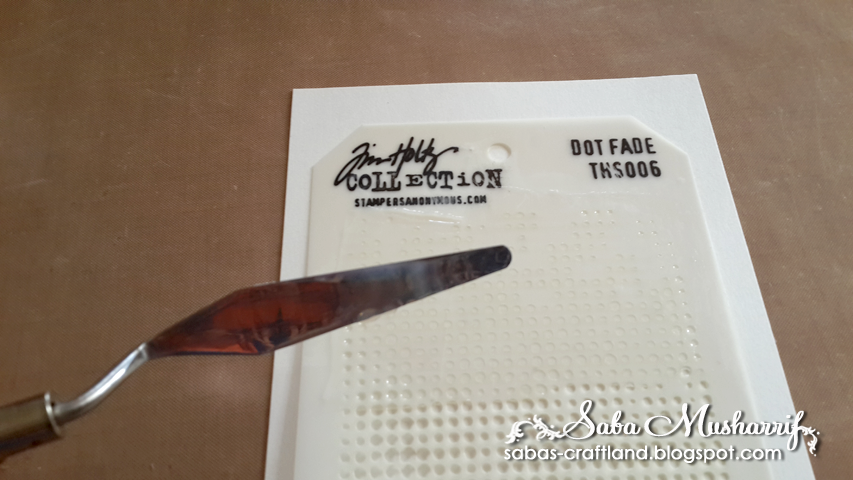
I layered the Tim Holtz Dot fade stencil onto the cardstock, and applied the adhesive over it with a painters knife.

I spread the adhesive evenly over all the required area. Once done I removed the stencil carefully, and soaked it in water immediately. To ensure that the stencil does not get spoilt, wash it immediately.

Once done, the adhesive needs to dry. As per the instructions, it dries in an hour, but in my case it dried in 10 minutes. I believe the weather, and thickness of the adhesive layer, impacts the drying time.

It is worthy to note here, that unlike other adhesives, the Thermoweb Deco Foil Adhesive stays sticky after it dries, and it is the stickiness that adheres the foil to the design. Each tube of Thermoweb Rainbow Deco Foil contains 5 sheets, and these are pretty thin sheets, so to be safe, when you take one out check ensure its just one and not two.


Next, I covered the adhesive base with foil, as seen above. When adhering the foil, please be sure that the bright shiny side is facing you. Then, gently rub over the foil to ensure it adheres well. I would not advice anyone to use a ruler, or a scoring at this stage, and avoid pressing down too hard on the foil, as it would make the adhesive spread and spoil the design.

Once satisfied, I gently peeled off the foil. Now, if you feel that some areas haven't foiled properly, just rub the foil over it again. As long as the adhesive is sticky, the foil with cover whatever area is left.

I was happy with how it turned out! its so simple and easy.

Now for the Gerbera Daisy, I used the spellbinders die which too was part of my kit.

Using the die, I cut out 16 petals each, 4 large and 2 small petal bases, and 2 centers. These dies make the task of flower making super simple. Just take each petal and push it through each slit, the large and medium petals go in the large base, while the small ones go into the small base. You can add glue to the tab on the bases, and stick the petals down as you push the petals in.

This is what they should look like. By the way, I cut the petals out of MME Look At This, and the petal bases and centers from  American Crafts Banana, textured cardstock.

Next, I shaped the petals lightly, which isn't necessary but I like shaping them. I simply flipped the layer over and shaped the petals with inward strokes. Did the same for the centers to curl them up. Next, I just stacked the layers one on top of the other and glued them down.


Last but not the least, I selected 2 purple Lillies, 1 pink Lilly,  2 pink rosebuds, and 3 leaves from the bunch of amazingly beautiful mulberry flowers, and arranged them over a decorative frame cut out of MME This Moment, which I adhered to the foiled base. Next I added a sentiment to finish it off.

A couple of close ups below:
 

Supplies Used:
Thermoweb Rainbow Deco Foil
Thermoweb Deco Foil Adhesive
Spellbinders Gerbera Daisy
MME Look At This
MME This Moment
American Crafts Banana
Purple Lillies
Pink Lilly
Pink rosebuds

Hope you enjoyed reading this post, looking forward to your entries to Challenge 11

Happy Crafting!
 
Related Posts Plugin for WordPress, Blogger...