Thursday, January 28, 2016

The Color Story

Most of us have a difficult time, when deciding the color combination for a project. "Does this match?" is the one question we ask ourselves repeatedly. So, to make things a little easy, I chose to share a couple of useful infographics, and a tutorial on the color theory as part of my last #craftykickstart16 post.

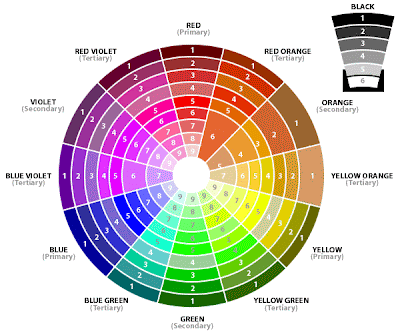
I'll start with the Tutorial, posted by Crafty Cardmakers in 2009! (yes, that long ago). It is a short, yet extremely informative post where they start by explaining common terms like Tone, Tint, Shade, followed by the 6 color schemes, and conclude with the color wheel, showing a range of tints and shades. (Reference image below linked from Crafty Cardmakers)
Next, is this graphic found on tugunicorn.blogspot.com. It starts with the wheel, and goes on to explain the different effects one can create using certain color combinations. Very useful as a reference.


Last, but not the least is this very comprehensive infographic by Kissmetrics. Though it is focused towards color combinations in web design, we as crafters can take a lot of useful pointers from it.

I hope this information helps you in choosing the right colors, in a shorter time.

This is my last post for #craftykickstart16, so be on the lookout for Amina, Amna, and Jaihan's post. We had a lot of fun interacting with all of you, and sharing all that we could in this time. We will, inshallah, continue to share and inspire, but not at the same pace. Hoping all of you are charged, and ready to participate in the Artful Crafting Monthly Challenges, which will resume from February inshallah.

Happy Crafting!
xoxo


Monday, January 25, 2016

Creativity Is Your Strength

Yesterday, I was so engrossed in all the #craftykickstart16 posts shared by Amna, Amina, and Jaihan, that I totally forgot about my post, oops!

This week I wanted to share the "Our Story" album / scrapbook / memory book that I had worked on last year (a month back to be exact). Some of you might have already seen the cover, but I am sharing the complete version here.

The reason for sharing this scrapbook as part of #craftkickstart16, is to let all those fabulous creative people out there know, that your creativity is your biggest strength. Sometimes if you don't find supplies for something you are working on, don't panic, and do not give up. YOU, by the Grace of the Almighty, can create anything and everything you need for a project, that is what I strongly believe. This scrapbook was one such project.

Our Story was meant for documenting special moments of a soon to be married couple, and the colors requested were Gold, Off-white and Deep Red.

As most of you know, Artful Crafting saves the day, thanks to the wide range of products available at the webstore, but in this case there was no cardstock available in the requested colors. So, I began searching through the FB based craft stores, but no luck there either. Next, I began sifting through supplies posted on our craft community pages, and didn't find anything.

At this point, I knew what I had to do. With a few gold foil, and offwhite sheets already in my stash I began planning the layouts, and how I would like the pages to look. I decided to gold emboss the offwhite cardstock, and compliment the layers with foil washi tape, which I ordered from Artful Crafting. With some mixed media techniques, color bloom sprays, and washi tape I was able to complete this beautiful scrapbook.


As per the client:

Never forget that "Creativity is your strength!"
Happy Crafting!
xoxo


Wednesday, January 20, 2016

Scalloped Petal Flower

Can't believe that January is nearly over, and we have only 11 days of CraftyKickstart16 left! Today I am sharing a super easy tutorial on how you can make the above scalloped petal flower. It is easy to make, and is simple yet very unique.

You will need:
4 scalloped squares, (2 large, 1 medium, and 1 small)
Glue
Stamens
Ink

5 scalloped square
I die cut the scalloped squares seen above, in 3 different sizes. You basically need 2 large scalloped squares, 1 medium scalloped square, and 1 small scalloped square.

Inked Edges
Next you need to ink the edges using a color which is a shade darker than the cardstock. Ink all the edges, of all the 4 scalloped squares.

The Folds
Once the edges have been inked, take on scalloped square and fold it in half. Then take the folded piece, and fold it in half again, so basically you've creased the square in quarters. Repeat this with all the four scalloped squares.

It is now time to give the quarters a petal shape.

Angled cuts
Unfold the quarter to half, and snip off the folded edges as seen in the above picture.  
Note: Do not cut all the way to the center. You must leave an approximate 0.5" space in the center, this will keep all the 4 petals intact, else they will fall apart.

Cutting the other edges
Unfold and refold to shape the other two sides, in the same fashion. The above picture shows how it should look at this stage. Repeat these steps for all the other pieces.

The shaped petals
The scalloped squares, should look like petals now; something similar to the above picture. The petals are now ready to be shaped as shown in the video below.


Note: The largest two will be shaped from the wrong side, while the remaining 2 pieces will be shaped right side up.

 
This is how they look after being shaped


To form the flower, the layers of petals need to be stacked and glued together, as shown in the video above.
Once glued together, I added some stamens to the center, and the flower was ready! [I didn't add stamens to the black one, but this one seemed incomplete without them.]

The final look
The top view.
That's all folks!
Happy Crafting!


Thursday, January 14, 2016

Essential Tools

I am back with my 3rd post for craftykickstart16!

Today I am sharing 3 of my favorite basic tools (other than scissors), and highlighting the importance of using the right tools. In my opinion these tools are a must for every paper crafter.
[Before I start, I just want to add that there are alternatives for practically every tool, BUT if you want to save time, and minimize effort, invest in the right tools]

1. Scoreboard
This is a must have, and if you are a paper crafter, this is your best friend! In ancient times, I would score the cardstock using a ruler, and an ink-less ballpoint pen; yes, it did get the job done, but it took me twice the time and effort. This is highly recommended if, you want to score straight lines in a matter of seconds.
I use the Martha Stewart Scoring tool, and it works great for me. It is true that sometimes, when you are going really fast, you might jump the line because the groves are only 1/8th of an inch apart, but I don't mind that much. I love the fact that there are groves every 1/8th inch, because that allows me to score multiple times, without having to move the cardstock around.

2. Trimmer
Buy it! Your wrists will thank you! Using the paper knife may serve the purpose, but when you use it frequently you realize the pressure it puts on your wrists, and your fingers. The trimmer is your savior. Go get it!
I've worked with Fiskars and Tonic, and between the two, I prefer Tonic simply because the blades last longer. Most trimmers come with a scoring tool, Tonic does too, but I prefer using a scoreboard especially when I am working with cardstock that is longer than 12".

3. Craft Sheet
If you like to keep your desk/table clean, and damage free, do invest in a craft sheet. It is worth the investment.
I use the Ranger Inkessential non-stick craft sheet. I like to keep my table clean, so before I owned a craftsheet I would use large plastic mats, and though they served the purpose, cleaning them wasn't very easy especially when I had to remove UHU or permanent ink from them. The rangers craft sheet is very easy to clean, one wipe does it all; I also realized that it makes inking with the blending tool a lot easier, for some reason the ink seems to just flow easily onto the cardstock when you are inking the edges, with the cardstock placed on the mat.

These are my top 3 essential tools, and in this post I've only highlighted what I like about them. If you would like to read more about their features, just click the hyperlinks in the post.

Happy Crafting!


Saturday, January 9, 2016

Customize The Ribbons

Hello! Today I am sharing the second tip for CraftyKickStart16, and this one highlights how you can customize organza ribbons to match your projects.

All you need is:
- A Stamp
- Some Organza Ribbon
- Archival Ink (or any other permanent ink)


Start by inking your stamp well, and planning how you'd like the design to appear on the ribbon. I am using a 0.5" ribbon, and my stamp is around 2" in diameter, so to get most of the design on my ribbon, I will be aligning the edge of the stamp, to that of the ribbon (as shown below).

Aligning one side
Notice that I have placed my ribbon on a piece of scrap; doing so keeps the ink off your mat. Now, I will continue stamping by aligning the opposite ends.

Aligning the opposite side
You can continue stamping till you have covered the required length of the ribbon. When stamping, please bear in mind that since this is organza, the stamped image will not be as bright as, the one stamped on paper.

The result!
Once done, leave it to dry. This technique not only customizes the ribbon, but adds a lot of interest/life to the otherwise plain organza ribbon.

Sharing some pictures of projects where I have used this technique.
Stamped the organza and the tag with the same stamp here; see how well they match

This stamped a bit light, simply because of the design

But here you can see how clean the stamped image is.

So, I hope this inspires you enough to try it out for yourself!
PS: you can find the organza ribbon at a local craft store/ stationary shop; while the stamps and inks are available at Artful Crafting. 

Don't forget to visit The Creative Element, for some more inspiration, tomorrow.

Happy Crafting!

Monday, January 4, 2016

More From A Punch

Hello Everybody!
Day 4 of Crafty January, and its my turn to share! Incase you are wondering why January 2016 is "Crafty", you should hop over to Crafty Kick Start 2016 for some enlightenment.

[and by the way, if you didn't know about it, then you've already missed 3 awesome DT posts]

I am focusing on paper punches today, as most of us own them, and hardly ever experiment with them. You can get a lot more than one design from your punch. In the below video, I demonstrate how you can use an edge punch, to create a design in the center of your paper / cardstock.


Now coming to the simple round paper punches. In the below video, I show you how to round the edges of a die-cut, using a round paper punch.


I hope these techniques help you in your projects!

Happy #craftykickstart16

xoxo 

Saturday, December 12, 2015

Altered Stars

Hello beautiful people!
Hoping all of you are keeping well, and enjoying the amazing weather! Karachi rarely experiences "winters", so I am delightedly that we are finally getting our share of the cold winds. Enough about the weather, now about crafts.

Today Artful Crafting's Challenge 9 goes live, and our theme is "Altering". Me thinks, this is one of our best themes so far, simply because we all have something or the other stored away, with the intention of altering at some point in time. Well lovelies, this is your chance to get started on all those boxes, bottles, mason jars, and what not, that you have been holding on to since forever.

I altered two star shaped, Darice paper mache, boxes which were part of my kit.
My December Kit from Artful Crafting
Before I move on to my project, I have to say that this Kraftastic Glittered Cardstock (By Ruby Rock It) is absolutely gorgeous, and unfortunately the pictures fail to capture their beauty. If you like glitter, these are a must have; highly recommended by me.

The Altered Boxes
I started by first collecting some coordinating cardstock, which I could use to highlight the Kraftastic cardstock. Highlighting was required, to keep the box and cardstock from blending in completely (This was my personal preference, you don't need to do it).

White was used with the Pink Starry Night and dark blue with the Blue Polka Dot. For the side I cut out a 1.75" wide strip of plain cardstock, and another strip of the Glittered cardstock. The glittered strip was about 1/8th inch narrower than the plain cardstock one. After inking both the strips, I adhered the base strip followed by the glittered cardstock.
A picture of the adhered base cardstock
For the top, I just traced the lid out on the glittered Pink Polka Dot, and cut it out by hand. For the blue one, I traced it out on plain dark blue cardstock, and cut it out by hand. It was then adhered, and embellished.

Close Up of the pink box
For the pink box, I painted the square Prima Antique Resin frame, with "hot pink" acrylic paint and left it to dry. Once dry, the details were highlighted with Platinum stickles. Next I fussy cut some stars from the cardstock and adhered a few in the center of the polka dot, and some to the back of the frame. The frame was then mounted onto chipboard, and carefully secured, such that it stays at an angle. The frame was then surrounded with Fluffy roses, and glitter balls. The large stars were outlined with Start Dust, while Hot Pink self adhesive bling, from Want 2 Scrap, was added to the lid, along with Bronze Micro Beads, by Prima. I came up with the sentiment myself.

Close Up of the blue box
For the blue box, I cut out straight banners from White Starry Night, and Blue Polka Dots. White Starry Night ones were outlined with Ocean Blue liquid pearls, while the Blue Polka Dot ones were outlined with Star Dust stickles. I kept the original color of the rectangular Prima Antique Resin frame, and highlighted the details with Ocean Blue liquid pearls. I took some liquid pearls on the tip of my finger and rubbed them over the details. Added flowers to the base of the frame, and some Turquoise self adhesive bling to the empty areas of the box.

Close up of the sides of the lids.
I finished off the boxes by decorating the sides of the pink box with 0.5" strip of white card, which I covered with Clear Rock Candy Distress Crackle Paint, after pasting it on. Once it was dry I went over it with Vintage Photo Distress ink and added horizontal lines, using Platinum stickles. For the blue box, I just added horizontal lines using Ocean Blue liquid pearls and Start Dust, to the original base.

Supplies Used:

Darice paper mache

White Starry Night
Pink Starry Night
Blue Polka Dots
Pink Polka Dot 


Start Dust Stickles
Platinum stickles


Turquoise self adhesive bling
Hot Pink self adhesive bling


Bronze Micro Beads

Prima Antique Resin frame

Clear Rock Candy Distress Crackle Paint
Vintage Photo Distress ink


That's all Folks!
(Oh! and just to let you know, the challenge is open world wide. If you want to play, just hop over to Challenge 9)

Happy Crafting.

Related Posts Plugin for WordPress, Blogger...